Docker

Docker is written in the Go programming language.
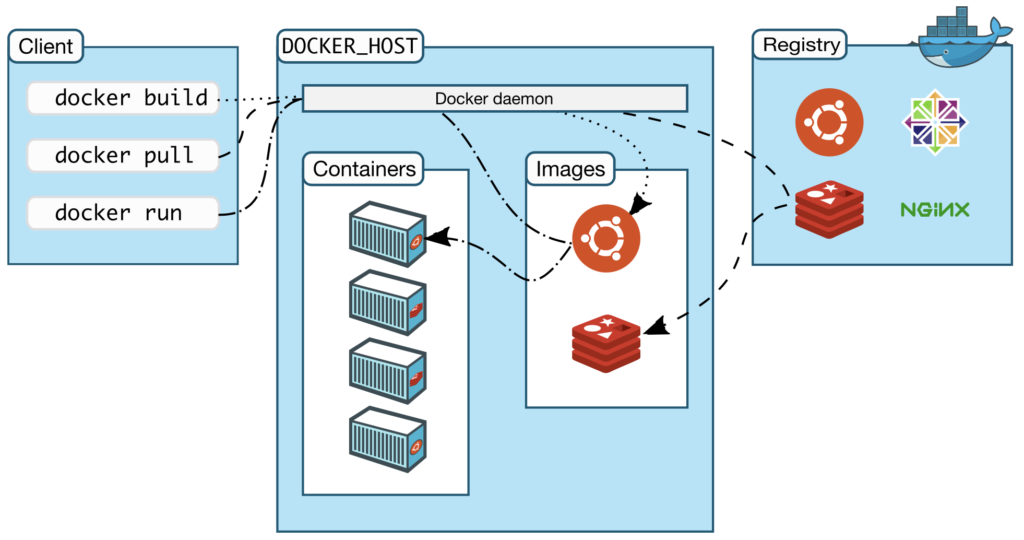
The Docker daemon

The Docker daemon ( dockerd cli ) listens for Docker API requests and manages Docker objects such as images, containers, networks, and volumes.

A docker daemon can also communicate with other docker daemons to manage Docker services.

The Docker client

The Docker client ( docker cli ) is the primary way to interact with Docker.

When you use commands such as docker run, docker build, docker pull , the Docker client sends these commands to dockerd .

The docker command uses the Docker API.

The Docker client ( docker cli ) can communicate with more than one Docker daemon.

Continue reading

Docker: MySQL, MariaDB, PostgreSQL

docker-compose.yml

version: '3.4'

services:
  mysql:
    image: mysql:latest
    container_name: mysql
    command: --default-authentication-plugin=mysql_native_password
    restart: always
    environment:
      MYSQL_ROOT_PASSWORD: root
      MYSQL_DATABASE: test_db
      MYSQL_USER: test
      MYSQL_PASSWORD: test
    ports:
      - 3306:3306
    volumes:
      - mysql_db_data_container:/var/lib/mysql:rw
      - ${PWD}/docker/mysql/initdb_sql_scripts:/docker-entrypoint-initdb.d/:ro
      - ${PWD}/docker/mysql/mysql.conf:/etc/mysql/conf.d
    healthcheck:
      test: "/usr/bin/mysql --user=root --password=password --execute \"SHOW DATABASES;\""
      interval: 2s
      timeout: 20s
      retries: 10

  mariadb:
    image: mariadb:latest
    container_name: mariadb
    restart: unless-stopped
    environment:
      MYSQL_ROOT_PASSWORD: root
      MYSQL_DATABASE: test_db
      MYSQL_USER: test
      MYSQL_PASSWORD: test
    ports:
      - 3307:3306
    volumes:
      - mariadb_data_container:/var/lib/mysql:rw
      - ${PWD}/docker/mariadb/initdb_sql_scripts:/docker-entrypoint-initdb.d/:ro
      - ${PWD}/docker/mariadb/mariadb.conf:/etc/mysql/conf.d

  postgres:
    image: postgres:latest
    container_name: postgres
    restart: always
    environment:
      POSTGRES_DB: test_db
      POSTGRES_USER: test
      POSTGRES_PASSWORD: test
    ports:
      - 5432:5432
    volumes:
      - postgres_db_data_container:/var/lib/postgresql/data:rw
      - ${PWD}/docker/postgres/initdb_sql_scripts:/docker-entrypoint-initdb.d:ro
      - ${PWD}/docker/postgres/postgres.conf:/etc/postgresql/postgresql.conf

volumes:
  mysql_db_data_container:
  mariadb_data_container:
  postgres_db_data_container:
Continue reading

Azure Cosmos DB Emulator and Storage Emulator

Azurite emulator provides a free local environment for testing your Azure blob, queue storage, and table storage applications. Find more details in https://docs.microsoft.com/en-us/azure/storage/common/storage-use-azurite?tabs=docker-hub

Cosmosdb emulator provides a local environment that emulates the Azure Cosmos DB service for development purposes. Using the Azure Cosmos DB Emulator, you can develop and test your application locally. You can develop applications using Azure Cosmos DB Emulator with the SQLCassandraMongoDBGremlin/Graph, and Table API accounts. Currently the data explorer in the emulator fully supports viewing SQL data only; the data created using MongoDB, Gremlin/Graph and Cassandra client applications it is not viewable at this time. 

Creating docker-compose.yml file

version: '3.4'

services:
  cosmosdb:
    container_name: cosmosdb
    image: "mcr.microsoft.com/cosmosdb/linux/azure-cosmos-emulator"
    tty: true
    restart: always
    mem_limit: 3g
    cpu_count: 2
    environment:
      - AZURE_COSMOS_EMULATOR_PARTITION_COUNT=10
      - AZURE_COSMOS_EMULATOR_ENABLE_DATA_PERSISTENCE=true
      - AZURE_COSMOS_EMULATOR_IP_ADDRESS_OVERRIDE=${HOST_IP}
    ports:
        - "8081:8081"
        - "10251:10251"
        - "10252:10252"
        - "10253:10253"
        - "10254:10254"
    volumes:
        - vol_cosmos:/data/db

  azurite:
    container_name: azurite
    image: "mcr.microsoft.com/azure-storage/azurite"
    restart: always
    ports:
        - "10000:10000"
        - "10001:10001"
        - "10002:10002"
    volumes:
        - vol_cosmos:/data

volumes:
  vol_cosmos:
Continue reading

Oracle Docker Container Exercise

You can up and run Oracle Docker container in your local machine and later connect from sqlplus CLI to query your database.

Follow the following Oracle GitHub link for more details

https://github.com/oracle/docker-images/tree/master/OracleDatabase/SingleInstance

After cloning Oracle docker-images repository from GitHub, run the following command in your terminal to build a Oracle Docker XE image.

docker build --force-rm=true --no-cache=true --shm-size=1G --build-arg DB_EDITION=xe -t oracle/database:18.4.0-xe -f Dockerfile.xe .

When build is done, run the following command to start a Oracle XE Database container.

docker run -d --name oracleXe --network=oracle_xe_network -p 1521:1521 -p 5500:5500 -e ORACLE_PWD="Pass_123456" oracle/database:18.4.0-xe

LoopBack 3 – Simple API with Redis Example

Expose your Redis NoSQL as a REST service with LoopBack 3 (Node.js Open API Framework)

This post is continuation of previous post. So if you want to start from beginning, read that one as well.

You can find LoopBack 3 project in the following repository. After clonning switch to mongodb branch 🙂 or run the following command.

git checkout redis

https://github.com/kenanhancer/loopback3-simple-api.git

MongoDB Docker Container Exercise

You can up and run MongoDB Docker container in your local machine and later connect from mysql CLI to query your collections.

Run the following command in your terminal to up and run a MongoDB NoSQL Docker container.

docker run -p 27017:27017 --name mongoDbTest -d mongo:latest

Run the below code in the terminal to connect to running container.

docker exec -it mongoDbTest bash

Run the below code in the terminal after connecting to container.

mongo

Follow the following link for more details

https://hub.docker.com/_/mongo

MySQL Docker Container Exercise

You can up and run MySQL Docker container in your local machine and later connect from mysql CLI to query your database.

Run the following command in your terminal to up and run a MySQL Database Docker container.

docker run -p 3306:3306 --name some-mysql -e MYSQL_ROOT_PASSWORD=my-secret-pw -d mysql:latest

Run the below code in the terminal to connect to running container.

docker exec -it some-mysql bash

Run the below code in the terminal after connecting to container.

mysql -h 127.0.0.1 -P 3306 -u root -p

Then you need to enter password, we need to enter my-secret-pw

Follow the following link for more details

https://hub.docker.com/_/mysql

There are more practice in this video 🙂

Kubernetes multi node cluster with One Updated Vagrant File

Actually there is already a Kubernetes multi node cluster post (https://kenanhancer.com/2018/09/26/kubernetes-multi-node-cluster-with-vagrant/) in this blog. But, this one is different. That post was showing 3 empty virtual server up and run later install tools step by step so it was taking too much time. If you run this Vagrantfile, it will create one master node and 2 worker nodes in Virtualbox. This Vagrantfile is also more configurable. If you need more servers, just append new item in "servers" array in Vagrantfile.

This is the expected result 🙂 As I mentioned at the beginning of the post, one master node and two worker nodes are created in Virtualbox.

Kubernetes single node cluster with Minikube and Vagrant

The following Vagrantfile code(syntax is Ruby) is creating single node Kubernetes cluster with Minikube.

Copy above code and follow the following screenshots. Run the following commands in Terminal.

mkdir MinikubeVagrant

cd MinikubeVagrant

nano Vagrantfile

Paste the Vagrantfile content like below.

save Vagrantfile and run the following command to start virtual machine.

vagrant up

Creating Kubernetes Dashboard Proxy

After Vagrant is up, it means that Minikube is ready to use. So, connect with SSH to Vagrant machine and run the following code to start Kubernetes Dashboard Proxy.

kubectl proxy --address 0.0.0.0 --port=8001 --accept-hosts '.*'

Connecting to Kubernetes Dashboard from Host machine

Click one of the following link to connect the Dashboard. Ta taaa 🙂

http://127.0.0.1:8001/api/v1/namespaces/kube-system/services/https:kubernetes-dashboard:/proxy/#!/login

or

http://localhost:8001/api/v1/namespaces/kube-system/services/https:kubernetes-dashboard:/proxy/#!/login

Rest of the details are already mentioned in this blog link Kubernetes multi node cluster with Vagrant (included Kubernetes Dashboards, Grafana, Prometheus)

read the Kubernetes Dashboard Access Control paragraph.