Docker is written in the Go programming language.
The Docker daemon
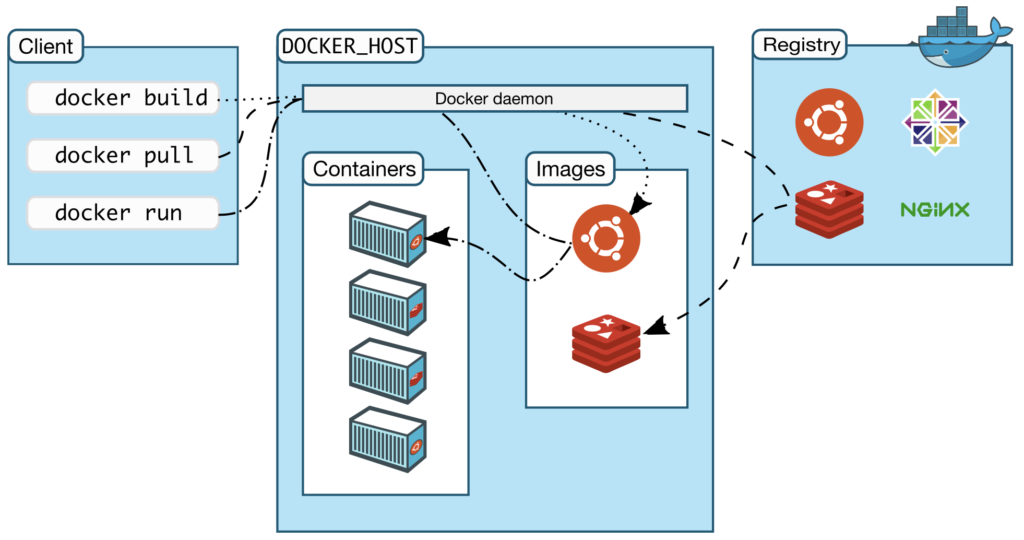
The Docker daemon ( dockerd cli ) listens for Docker API requests and manages Docker objects such as images, containers, networks, and volumes.
A docker daemon can also communicate with other docker daemons to manage Docker services.
The Docker client
The Docker client ( docker cli ) is the primary way to interact with Docker.
When you use commands such as docker run, docker build, docker pull , the Docker client sends these commands to dockerd .
The docker command uses the Docker API.
The Docker client ( docker cli ) can communicate with more than one Docker daemon.
Docker Desktop
The Docker Desktop is an easy-to-install application for your Mac or Windows environment. Docker Desktop includes the Docker daemon ( dockerd cli ), the Docker client ( docker cli ), Docker Compose, Docker Content Trust, Kubernetes.
Docker registries
A Docker registry stores Docker images.
Docker Hub is a public registry that anyone can use, and Docker is configured to look for images on Docker Hub by default. You can even run your own private registry.
When you use the docker pull or docker run commands, the required images are pulled from your configured registry. When you use the docker push command, your image is pushed to your configured registry.
Docker objects
Images
A Docker image is a read-only template with instructions for creating a Docker container.
You might create your own images or you might only use images created by others and published in a registry.
To build your own image, you create a Dockerfile for defining the steps needed to create the image and run it. Each instruction in a Dockerfile creates a layer in the image. When you change the Dockerfile and rebuild the image, only those layers which have changed are rebuilt.
Containers
A Docker container is a runnable instance of an Docker image.
You can create, start, stop, move, or delete a Docker container using the Docker API or Docker CLI.
You can connect a Docker container to one or more networks, attach storage to Docker container, or event create a new Docker image based on its current state.
By default, a Docker container is relatively well isolated from other Docker containers and its host machine. You can control how isolated a container's network, storage, or other underlying subsystems are from other containers or from the host machine.
Some examples
$ docker run -i -t ubuntu /bin/bash

# or

$ docker run -i -t ubuntu bash
$ docker run -i -t ubuntu /bin/sh
# or
$ docker run -i -t ubuntu sh$ docker run ubuntu bash -c "date"
Tue Jul 12 21:55:54 UTC 2022$ docker run ubuntu sh -c "date"
Tue Jul 12 21:55:54 UTC 2022$ docker run alpine sh -c "date"
Tue Jul 12 21:55:54 UTC 2022$ docker run --rm alpine sh -c "echo This is a test. | wc"
1 4 16$ docker run --rm alpine echo "This is a test." | wc
1 4 16$ docker build -t demo -<<EOF
from alpine
cmd echo "Hello World!"
EOF
[+] Building 0.1s (5/5) FINISHED
=> [internal] load build definition from Dockerfile 0.0s
=> => transferring dockerfile: 78B 0.0s
=> [internal] load .dockerignore 0.0s
=> => transferring context: 2B 0.0s
=> [internal] load metadata for docker.io/library/alpine:latest 0.0s
=> CACHED [1/1] FROM docker.io/library/alpine 0.0s
=> exporting to image 0.0s
=> => exporting layers 0.0s
=> => writing image sha256:d47ab6866e4669e6aabc5f679f37a16f049d3b371caa277336657852848991f9 0.0s
=> => naming to docker.io/library/demo 0.0s
$ docker run --rm demo
Hello World!$ docker build -t demo_nginx -<<EOF
FROM nginx:alpine
RUN echo "Hello world" > index.html && cp index.html /usr/share/nginx/html
WORKDIR /usr/share/nginx/html
EOF
[+] Building 1.3s (8/8) FINISHED
=> [internal] load build definition from Dockerfile 0.0s
=> => transferring dockerfile: 165B 0.0s
=> [internal] load .dockerignore 0.0s
=> => transferring context: 2B 0.0s
=> [internal] load metadata for docker.io/library/nginx:alpine 1.0s
=> [auth] library/nginx:pull token for registry-1.docker.io 0.0s
=> CACHED [1/3] FROM docker.io/library/nginx:alpine@sha256:8e38930f0390cbd79b2d1528405fb17edcda 0.0s
=> [2/3] RUN echo "Hello world" > index.html && cp index.html /usr/share/nginx/html 0.2s
=> [3/3] WORKDIR /usr/share/nginx/html 0.0s
=> exporting to image 0.0s
=> => exporting layers 0.0s
=> => writing image sha256:22da3c78a8380397fe4c65310219988d015b6985463400cf1666974c2f249a40 0.0s
=> => naming to docker.io/library/demo_nginx 0.0s
$ docker run --rm -d -p 8080:80 demo_nginx
50907f6772313b0b8e2cbc3743897ffe58c41fbbe54f0cd70e4189f97e6ebd96
$ docker run -d -p 80:80 docker/getting-started$ docker run -dp 80:80 docker/getting-started-drun the container in detached mode(in the background)-p 80:80map port 80 of the host to port 80 in the containerdocker/getting-startedthe image to use