I just want to see my micro services in a tree view. This is a configurable and flexible D3 Node.js project. In order to achieve this project, I have used D3, Node.js and Parcel (https://parceljs.org). I hope that some one will benefit from this project like me 🙂
Month: September 2019
Kubernetes configure kubectl to use multiple clusters
First of all, you need to have kubectl CLI in your host machine. So, follow the below steps.
Install with Chocolatey on Windows
choco install kubernetes-cliInstall with Homebrew on MacOS
brew install kubernetes-cliInstall with Kubernetes Official Documentation(with Curl)
Follow this link https://kubernetes.io/docs/tasks/tools/install-kubectl/#install-kubectl-on-macos
Test to ensure the version you installed
kubectl versionChecking kubectl config
When you run below command, you will see output as shown in the following screenshot. I didn't configure yet so, it shows an empty config.
kubectl config view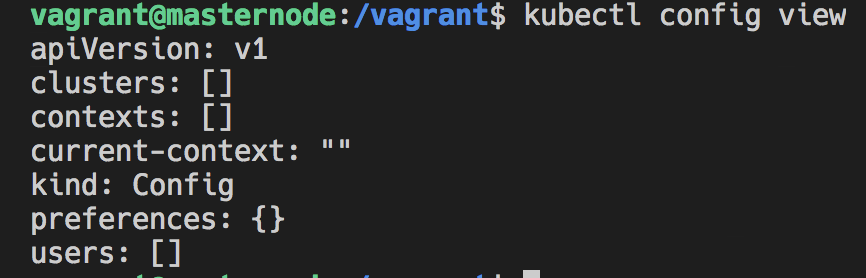
Creating, Starting, Stopping, Packaging and Publishing a Vagrant Box
I use Vagrant for local development in order to build any development environment. For example, when I need a Kubernetes multi node cluster, I can demonstrate with Vagrant quickly(https://kenanhancer.com/2019/09/08/kubernetes-multi-node-cluster-with-one-updated-vagrant-file/). After I complete my exercise about any technology, I also publish to Vagrant Cloud so that it can be used later without wasting time. But, I am not using only Vagrant, there are different technologies and there are different CLI for them. So, if I don't use one technology sometime, I can forget some important commands. That's why, this post is important for me to remember Vagrant CLI 🙂
To read more information about Vagrant CLI https://www.vagrantup.com/docs/cli/ follow official link.
Oracle Docker Container Exercise
You can up and run Oracle Docker container in your local machine and later connect from sqlplus CLI to query your database.
Follow the following Oracle GitHub link for more details
https://github.com/oracle/docker-images/tree/master/OracleDatabase/SingleInstance
After cloning Oracle docker-images repository from GitHub, run the following command in your terminal to build a Oracle Docker XE image.
docker build --force-rm=true --no-cache=true --shm-size=1G --build-arg DB_EDITION=xe -t oracle/database:18.4.0-xe -f Dockerfile.xe .When build is done, run the following command to start a Oracle XE Database container.
docker run -d --name oracleXe --network=oracle_xe_network -p 1521:1521 -p 5500:5500 -e ORACLE_PWD="Pass_123456" oracle/database:18.4.0-xeLoopBack 3 – Simple API with Redis Example
Expose your Redis NoSQL as a REST service with LoopBack 3 (Node.js Open API Framework)
This post is continuation of previous post. So if you want to start from beginning, read that one as well.
You can find LoopBack 3 project in the following repository. After clonning switch to mongodb branch 🙂 or run the following command.
git checkout redisLoopBack 3 – Simple API with MongoDB Example
Expose your MongoDB NoSQL as a REST service with LoopBack 3 (Node.js Open API Framework)
This post is continuation of previous post. So if you want to start from beginning, read that one as well.
Follow this link to create a MongoDB Docker container 🙂
You can find LoopBack 3 project in the following repository. After clonning switch to mongodb branch 🙂 or run the following command.
git checkout mongodbMongoDB Docker Container Exercise
You can up and run MongoDB Docker container in your local machine and later connect from mysql CLI to query your collections.
Run the following command in your terminal to up and run a MongoDB NoSQL Docker container.
docker run -p 27017:27017 --name mongoDbTest -d mongo:latestRun the below code in the terminal to connect to running container.
docker exec -it mongoDbTest bashRun the below code in the terminal after connecting to container.
mongoFollow the following link for more details
https://hub.docker.com/_/mongo
LoopBack 3 – Simple API with MySQL Example
Expose your MySQL Database as a REST service with LoopBack 3 (Node.js Open API Framework)
This post is continuation of previous post. So if you want to start from beginning, read that one as well.
Follow this link to create a MySQL container 🙂
Node.js MySQL example will not start wihout running the following code in MySQL Database container. So, run the following command in terminal. If your Node.js app still doesn't connect, then try other options.
ALTER USER 'root'@'%' IDENTIFIED WITH mysql_native_password BY 'your_root_password';
ALTER USER 'root'@'localhost' IDENTIFIED WITH mysql_native_password BY 'your_root_password';
Run the following script for normal user.
ALTER USER 'foo'@'%' IDENTIFIED WITH mysql_native_password BY 'your_foo_password';
ALTER USER 'foo'@'localhost' IDENTIFIED WITH mysql_native_password BY 'your_foo_password';
Then run the following script
FLUSH PRIVILEGES;You can find LoopBack 3 project in the following repository. After clonning switch to mysql branch 🙂 or run the following command.
git checkout mysqlMySQL Docker Container Exercise
You can up and run MySQL Docker container in your local machine and later connect from mysql CLI to query your database.
Run the following command in your terminal to up and run a MySQL Database Docker container.
docker run -p 3306:3306 --name some-mysql -e MYSQL_ROOT_PASSWORD=my-secret-pw -d mysql:latestRun the below code in the terminal to connect to running container.
docker exec -it some-mysql bashRun the below code in the terminal after connecting to container.
mysql -h 127.0.0.1 -P 3306 -u root -pThen you need to enter password, we need to enter my-secret-pw
Follow the following link for more details
https://hub.docker.com/_/mysql
There are more practice in this video 🙂
LoopBack 3 – Simple API Example
I am developing APIs with Node.js and LoopBack during last one year. So, it is time to create a post about it. 🙂 I try to build a detailed project. I hope that this post will be a good reference for developers.
Install LoopBack CLI Tools
There are two LoopBack CLI Tools.
You can also use the legacy StrongLoop CLI tool slc
Install LoopBack CLI Tool
$ npm install -g loopback-cliThis installs the lb command-line tool for scaffolding and modifying LoopBack applications.