Kubernetes configure kubectl to use multiple clusters

First of all, you need to have kubectl CLI in your host machine. So, follow the below steps.

Install with Chocolatey on Windows

choco install kubernetes-cli

Install with Homebrew on MacOS

brew install kubernetes-cli

Install with Kubernetes Official Documentation(with Curl)

Follow this link https://kubernetes.io/docs/tasks/tools/install-kubectl/#install-kubectl-on-macos

Test to ensure the version you installed

kubectl version

Checking kubectl config

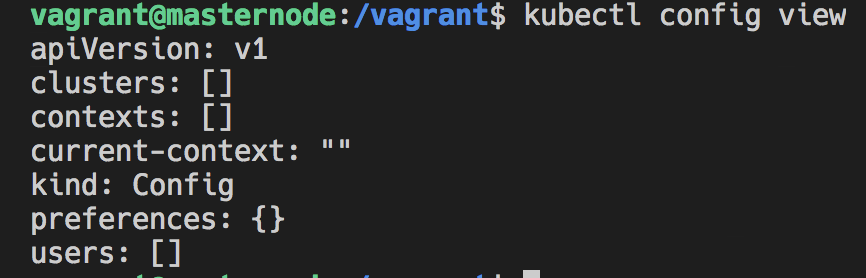
When you run below command, you will see output as shown in the following screenshot. I didn't configure yet so, it shows an empty config.

kubectl config view
Continue reading

Kubernetes multi node cluster with One Updated Vagrant File

Actually there is already a Kubernetes multi node cluster post (https://kenanhancer.com/2018/09/26/kubernetes-multi-node-cluster-with-vagrant/) in this blog. But, this one is different. That post was showing 3 empty virtual server up and run later install tools step by step so it was taking too much time. If you run this Vagrantfile, it will create one master node and 2 worker nodes in Virtualbox. This Vagrantfile is also more configurable. If you need more servers, just append new item in "servers" array in Vagrantfile.

This is the expected result 🙂 As I mentioned at the beginning of the post, one master node and two worker nodes are created in Virtualbox.

Kubernetes single node cluster with Minikube and Vagrant

The following Vagrantfile code(syntax is Ruby) is creating single node Kubernetes cluster with Minikube.

Copy above code and follow the following screenshots. Run the following commands in Terminal.

mkdir MinikubeVagrant

cd MinikubeVagrant

nano Vagrantfile

Paste the Vagrantfile content like below.

save Vagrantfile and run the following command to start virtual machine.

vagrant up

Creating Kubernetes Dashboard Proxy

After Vagrant is up, it means that Minikube is ready to use. So, connect with SSH to Vagrant machine and run the following code to start Kubernetes Dashboard Proxy.

kubectl proxy --address 0.0.0.0 --port=8001 --accept-hosts '.*'

Connecting to Kubernetes Dashboard from Host machine

Click one of the following link to connect the Dashboard. Ta taaa 🙂

http://127.0.0.1:8001/api/v1/namespaces/kube-system/services/https:kubernetes-dashboard:/proxy/#!/login

or

http://localhost:8001/api/v1/namespaces/kube-system/services/https:kubernetes-dashboard:/proxy/#!/login

Rest of the details are already mentioned in this blog link Kubernetes multi node cluster with Vagrant (included Kubernetes Dashboards, Grafana, Prometheus)

read the Kubernetes Dashboard Access Control paragraph.

Kubernetes multi node cluster with Vagrant (included Kubernetes Dashboards, Grafana, Prometheus)

The following Vagrantfile code(syntax is Ruby) is creating one master node and two worker nodes for Kubernetes.

Go to Vagrantfile directory in Terminal and run the following code to create virtual machines.

The following Vagrantfile code(syntax is Ruby) is creating one master node and two worker nodes for Kubernetes.

Go to Vagrantfile directory in Terminal and run the following code to create virtual machines.

As you can see in the below picture, three virtual machines are obtained and running.

But, Kubernetes cluester is still not ready. We created just an environment to install the cluster.
Continue reading