How to compile multiple Java source files using wildcard
javac -d ./target/classes ./src/main/**/*.java
How to specify dependency jar file when compiling
Trying to compile ./src folder completely will throw exception due to junit.jar file dependency. So, it should be specified using -cp option which means –classpath as below.
JavaString variable contains a collection of characters surrounded by double quotes.
An array of characters works same as Java String.
Java Strings are used for storing text.
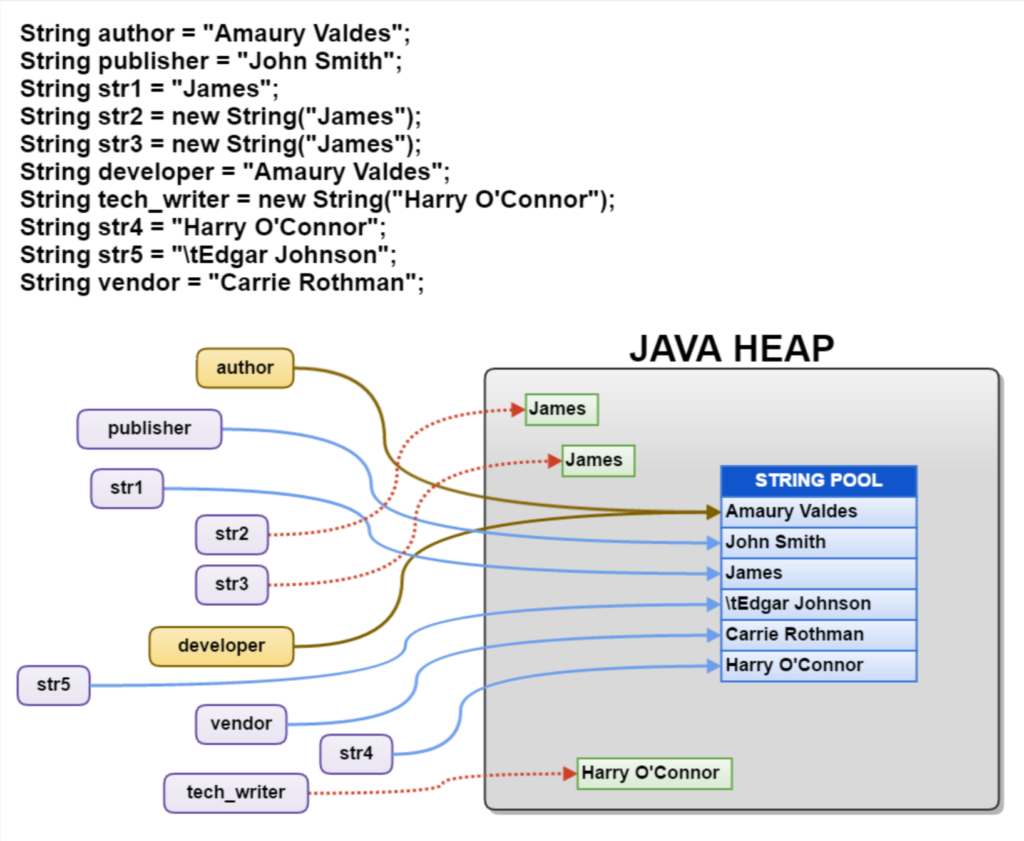
In Java, Strings are immutable or final or constant which means each time when we are creating or editing or performing any method to change string, one string created in "String Constant Pool"
Immutable strings eliminate race conditions in multi-threaded applications.
Each time you create a string literal, the JVM checks the "string constant pool" first. If the string already exists in the pool, a reference to the pooled instance is returned. If the string doesn't exist in the pool, a new string instance is created and placed in the pool.
In other words, we don't create any String object using new keyword above. The JVM does that task for us, it create a String object. If the String object exist in the memory, it doesn't create a new String object rather it assigns the same old object to the new instance, that means even though we have two String instances above(str1 and str2) compiler only created one String object and assigned the same to both the instances.
For example there are 5 String instances that have same value, it means that in memory there is only one String object having the value and all the 5 String instances would be pointing to the same String object.
What if we want to have two different String object with the same String. For that we would need to create Strings using new keyword
2- Using new keyword
String str1 = new String("Hello World!");
String str2 = new String("Hello World!");
In such case, the JVM will create a new String object in normal (non-pool) heap memory.
Notice that JVM handles allocation of memory space for string variables efficiently, whenever we create a String variable and assign a String value with String Literal(double quotes) , JVM check value of String variable in String pool, if found, it returns reference of String object, if not found then it creates a new String object in String pool and return reference of it.
I found some images from google to represent. So, there are three images below.
J2SE 1.4 (February 2002) – Introduced regular expressions, image I/O API, and more.
Java SE 5 (J2SE 1.5) (September 2004) – Introduced generics, metadata annotations, enumerated types, and more.
Java SE 6 (December 2006) – Introduced scripting support, JVM improvements, and more.
Java SE 7 (July 2011) – Introduced the try-with-resources statement, the diamond operator, and more.
Java SE 8 (March 2014) – Introduced lambdas, streams, and the java.time package.
Java SE 9 (September 2017) – Introduced the module system.
Java SE 10 (March 2018) – Introduced local-variable type inference (var).
Java SE 11 (September 2018) – Introduced String::lines, isBlank, and other methods, plus the java.net.http HttpClient.
Java SE 12 (March 2019) – Introduced switch expressions (preview) and more.
Java SE 13 (September 2019) – Introduced text blocks (preview) and more enhancements.
Java SE 14 (March 2020) – Introduced pattern matching for instanceof (preview) and other improvements.
Java SE 15 (September 2020) – Continued the introduction and enhancement of several features.
Java SE 16 (March 2021) – Introduced sealed classes (preview) and other enhancements.
Java SE 17 (September 2021) – This version is an LTS (Long Term Support) release, which means it will receive updates for a longer period than the interim releases.
Java SE 18 (March 2022)
Java SE 19 (September 2022)
Java SE 20 (March 2023)
Java SE 21 (September 2023)
Java has moved to a time-driven release model, with new versions being released every six months. Not all of these are long-term support (LTS) versions. As of Java 17, the LTS versions have been Java 8, Java 11, and Java 17.
# list available JDK's
$ jabba ls-remote

# you can use any valid semver range to narrow down the list
$ jabba ls-remote zulu@~1.8.60
$ jabba ls-remote "*@>=1.6.45 <1.9" --latest=minor

# install Oracle JDK
$ jabba install 1.8

# install Oracle Server JRE
$ jabba install sjre@1.8

# install Adopt OpenJDK (Hotspot)
$ jabba install adopt@1.8-0

# install Adopt OpenJDK (Eclipse OpenJ9)
$ jabba install adopt-openj9@1.9-0

# install Zulu OpenJDK
$ jabba install zulu@1.8
$ jabba install zulu@~1.8.144 # same as "zulu@>=1.8.144 <1.9"

# install IBM SDK, Java Technology Edition
$ jabba install ibm@1.8

# install GraalVM CE
$ jabba install graalvm@1.0-0

# install OpenJDK
$ jabba install openjdk@1.10-0

# install OpenJDK with Shenandoah GC
$ jabba install openjdk-shenandoah@1.10-0

# install from custom URL
# (supported qualifiers: zip (since 0.3.0), tgz, tgx (since 0.10.0), dmg, bin, exe)
$ jabba install 1.8.0-custom=tgz+http://example.com/distribution.tar.gz
$ jabba install 1.8.0-custom=tgx+http://example.com/distribution.tar.xz
$ jabba install 1.8.0-custom=zip+file:///opt/distribution.zip

# uninstall JDK
$ jabba uninstall zulu@1.6.77

# link system JDK
$ jabba link system@1.8.72 /Library/Java/JavaVirtualMachines/jdk1.8.0_72.jdk

# list all installed JDK's
$ jabba ls

# switch to a different version of JDK (it must be already `install`ed)
$ jabba use adopt@1.8
$ jabba use zulu@~1.6.97

$ echo "1.8" > .jabbarc
# switch to the JDK specified in .jabbarc (since 0.5.0)
$ jabba use

# set default java version on shell (since 0.2.0)
# this version will automatically be "jabba use"d every time you open up a new terminal
$ jabba alias default 1.8
jenv is a tool that helps you switch between different java versions in your development machine. But, Jenv doesn't install Java for you.
Use your platform appropriate package manager to install Java. On macOS, brew is recommended.
Install Java with Homebrew
First, ensure that you have Homebrew installed in your system. Homebrew is a package manager for Mac OS. So if you want to learn more details about it, visit my blog below.
nano ~/.bashrc

# add these three lines at the end of file and CTRL+X and Y and click enter :)

export M2_HOME=/usr/local/apache-maven/apache-maven-3.6.3
export M2=$M2_HOME/bin
export PATH=$M2:$PATH

source ~/.bashrc
J2SE 1.4 (February 2002) – Introduced regular expressions, image I/O API, and more.
Java SE 5 (J2SE 1.5) (September 2004) – Introduced generics, metadata annotations, enumerated types, and more.
Java SE 6 (December 2006) – Introduced scripting support, JVM improvements, and more.
Java SE 7 (July 2011) – Introduced the try-with-resources statement, the diamond operator, and more.
Java SE 8 (March 2014) – Introduced lambdas, streams, and the java.time package.
Java SE 9 (September 2017) – Introduced the module system.
Java SE 10 (March 2018) – Introduced local-variable type inference (var).
Java SE 11 (September 2018) – Introduced String::lines, isBlank, and other methods, plus the java.net.http HttpClient.
Java SE 12 (March 2019) – Introduced switch expressions (preview) and more.
Java SE 13 (September 2019) – Introduced text blocks (preview) and more enhancements.
Java SE 14 (March 2020) – Introduced pattern matching for instanceof (preview) and other improvements.
Java SE 15 (September 2020) – Continued the introduction and enhancement of several features.
Java SE 16 (March 2021) – Introduced sealed classes (preview) and other enhancements.
Java SE 17 (September 2021) – This version is an LTS (Long Term Support) release, which means it will receive updates for a longer period than the interim releases.
Java SE 18 (March 2022)
Java SE 19 (September 2022)
Java SE 20 (March 2023)
Java SE 21 (September 2023)
Java has moved to a time-driven release model, with new versions being released every six months. Not all of these are long-term support (LTS) versions. As of Java 17, the LTS versions have been Java 8, Java 11, and Java 17.
But you can download JDK programmatically as the following. Java SE 7, 8, 9, 10, 11, 12, 13 are included below script. So, run below script in your terminal.
# Java SE 7
wget https://download.java.net/openjdk/jdk7u75/ri/openjdk-7u75-b13-linux-x64-18_dec_2014.tar.gz

# Java SE 8
wget https://download.java.net/openjdk/jdk8u40/ri/openjdk-8u40-b25-linux-x64-10_feb_2015.tar.gz

# Java SE 9
wget https://download.java.net/java/GA/jdk9/9.0.4/binaries/openjdk-9.0.4_linux-x64_bin.tar.gz

# Java SE 10
wget https://download.java.net/java/GA/jdk10/10.0.2/19aef61b38124481863b1413dce1855f/13/openjdk-10.0.2_linux-x64_bin.tar.gz

# Java SE 11
wget https://download.java.net/java/GA/jdk11/9/GPL/openjdk-11.0.2_linux-x64_bin.tar.gz

# Java SE 12
wget https://download.java.net/java/GA/jdk12.0.2/e482c34c86bd4bf8b56c0b35558996b9/10/GPL/openjdk-12.0.2_linux-x64_bin.tar.gz

# Java SE 13
wget https://download.java.net/java/GA/jdk13/5b8a42f3905b406298b72d750b6919f6/33/GPL/openjdk-13_linux-x64_bin.tar.gz


mkdir /usr/lib/jvm


# Extract all downloaded jdk files
tar -xvzf openjdk-7u75-b13-linux-x64-18_dec_2014.tar.gz -C /usr/lib/jvm

tar -xvzf openjdk-8u40-b25-linux-x64-10_feb_2015.tar.gz -C /usr/lib/jvm

tar -xvzf openjdk-9.0.4_linux-x64_bin.tar.gz -C /usr/lib/jvm

tar -xvzf openjdk-10.0.2_linux-x64_bin.tar.gz -C /usr/lib/jvm

tar -xvzf openjdk-11.0.2_linux-x64_bin.tar.gz -C /usr/lib/jvm

tar -xvzf openjdk-12.0.2_linux-x64_bin.tar.gz -C /usr/lib/jvm

tar -xvzf openjdk-13_linux-x64_bin.tar.gz -C /usr/lib/jvm


# Remove downloaded jdk files
rm openjdk*


# Install Java and Java Compiler to Environment
update-alternatives --install /usr/bin/java java /usr/lib/jvm/java-se-7u75-ri/bin/java 1

update-alternatives --install /usr/bin/javac javac /usr/lib/jvm/java-se-7u75-ri/bin/javac 1

update-alternatives --install /usr/bin/java java /usr/lib/jvm/java-se-8u40-ri/bin/java 2

update-alternatives --install /usr/bin/javac javac /usr/lib/jvm/java-se-8u40-ri/bin/javac 2

update-alternatives --install /usr/bin/java java /usr/lib/jvm/jdk-9.0.4/bin/java 3

update-alternatives --install /usr/bin/javac javac /usr/lib/jvm/jdk-9.0.4/bin/javac 3

update-alternatives --install /usr/bin/java java /usr/lib/jvm/jdk-10.0.2/bin/java 4

update-alternatives --install /usr/bin/javac javac /usr/lib/jvm/jdk-10.0.2/bin/javac 4

update-alternatives --install /usr/bin/java java /usr/lib/jvm/jdk-11.0.2/bin/java 5

update-alternatives --install /usr/bin/javac javac /usr/lib/jvm/jdk-11.0.2/bin/javac 5

update-alternatives --install /usr/bin/java java /usr/lib/jvm/jdk-12.0.2/bin/java 6

update-alternatives --install /usr/bin/javac javac /usr/lib/jvm/jdk-12.0.2/bin/javac 6

update-alternatives --install /usr/bin/java java /usr/lib/jvm/jdk-13/bin/java 7

update-alternatives --install /usr/bin/javac javac /usr/lib/jvm/jdk-13/bin/javac 7


# Verify Java and Java Compiler Installation
# check if java command is pointing to correct path in system
update-alternatives --display java
update-alternatives --display javac

# List all environment variables
update-alternatives --get-selections
# or
update-alternatives --get-selections | grep java
# or
update-alternatives --get-selections | grep ^java
Check Java Version
# Verify if Java is running
java -version

# Verify if Java Compiler is running
javac -version
The purpose of the Singleton pattern is to ensure that only a single instance of a class can exist at one time and provide a global point of access to it.