The following Vagrantfile code(syntax is Ruby) is creating one master node and two worker nodes for Kubernetes.
Go to Vagrantfile directory in Terminal and run the following code to create virtual machines.

The following Vagrantfile code(syntax is Ruby) is creating one master node and two worker nodes for Kubernetes.
Go to Vagrantfile directory in Terminal and run the following code to create virtual machines.
As you can see in the below picture, three virtual machines are obtained and running.
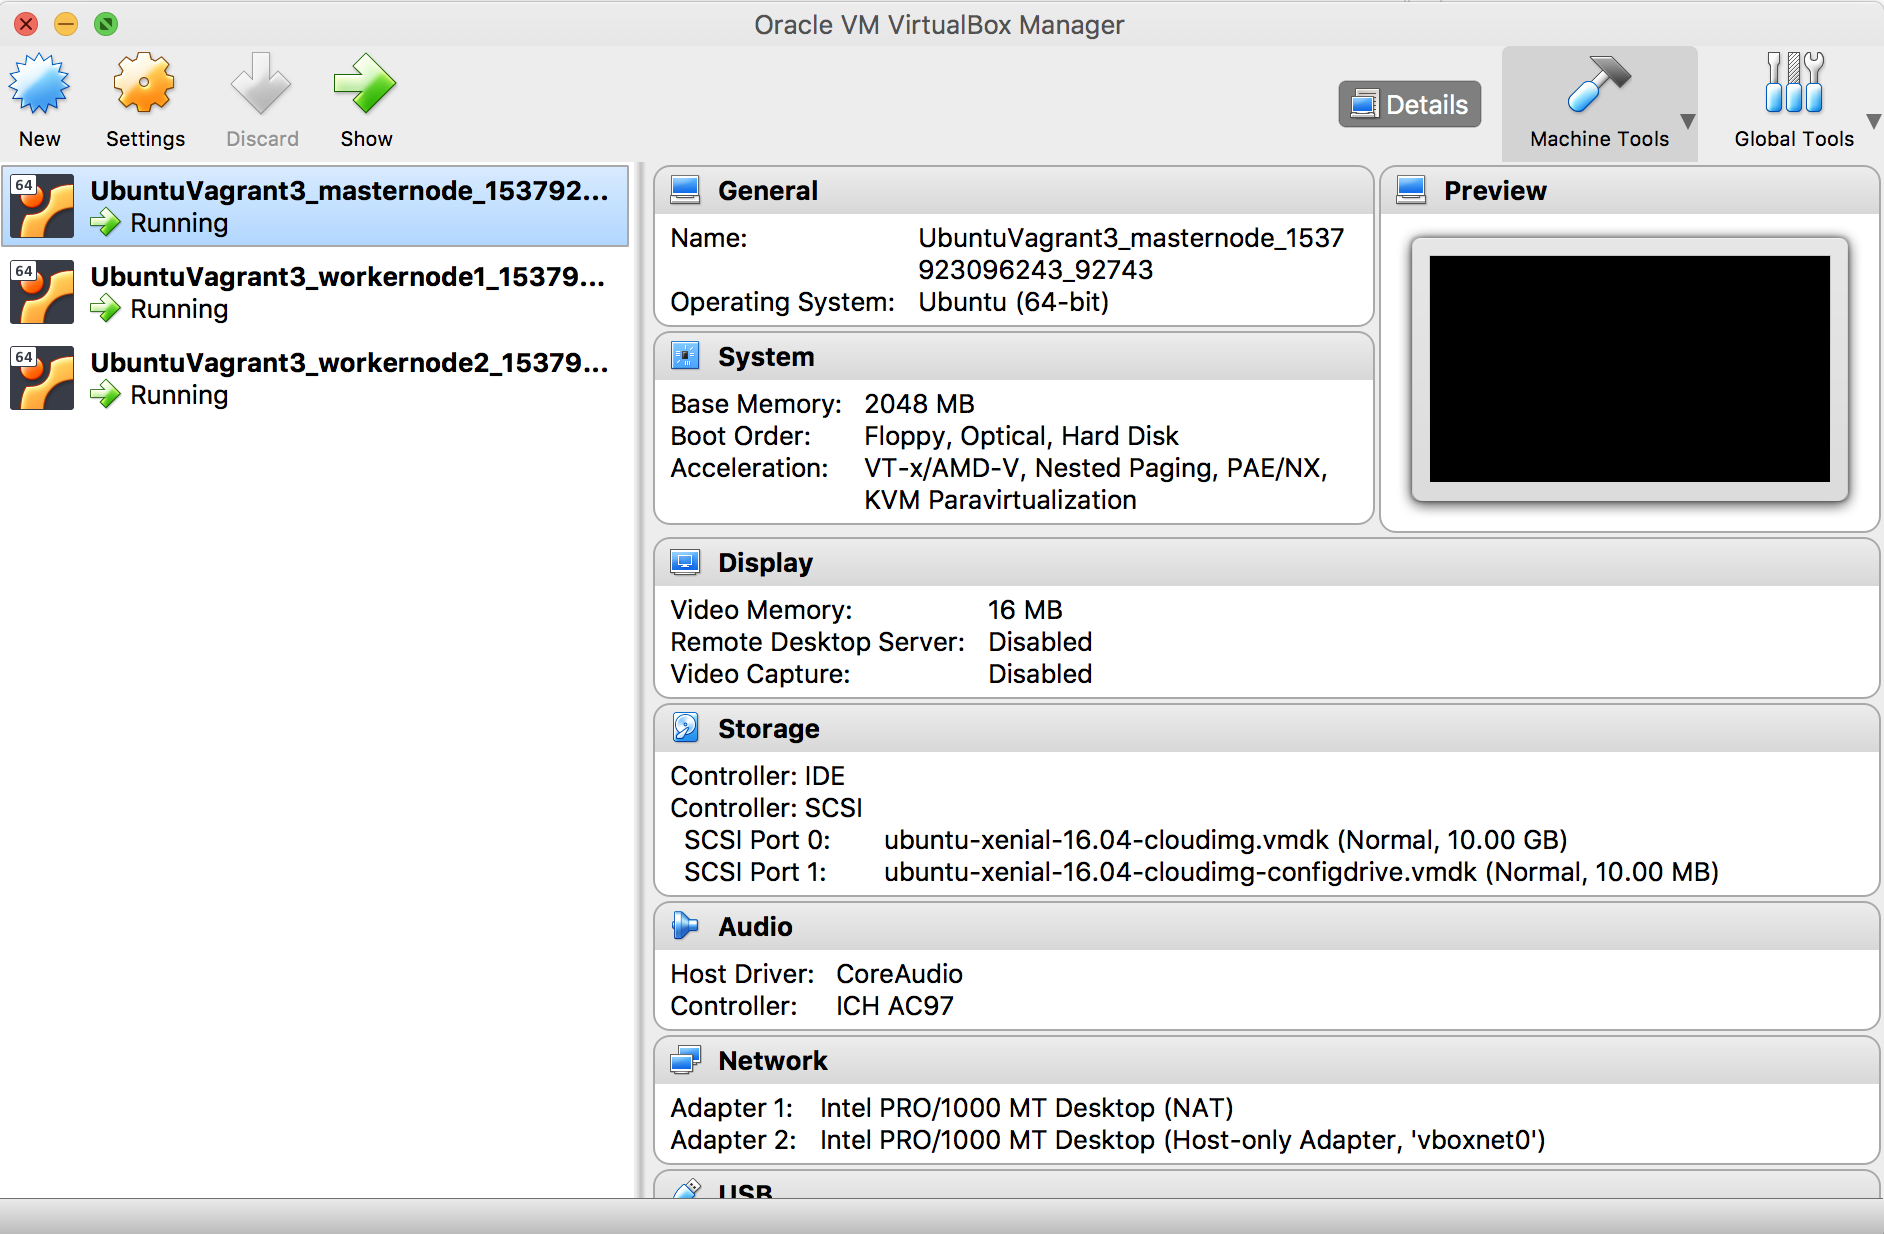
But, Kubernetes cluester is still not ready. We created just an environment to install the cluster.
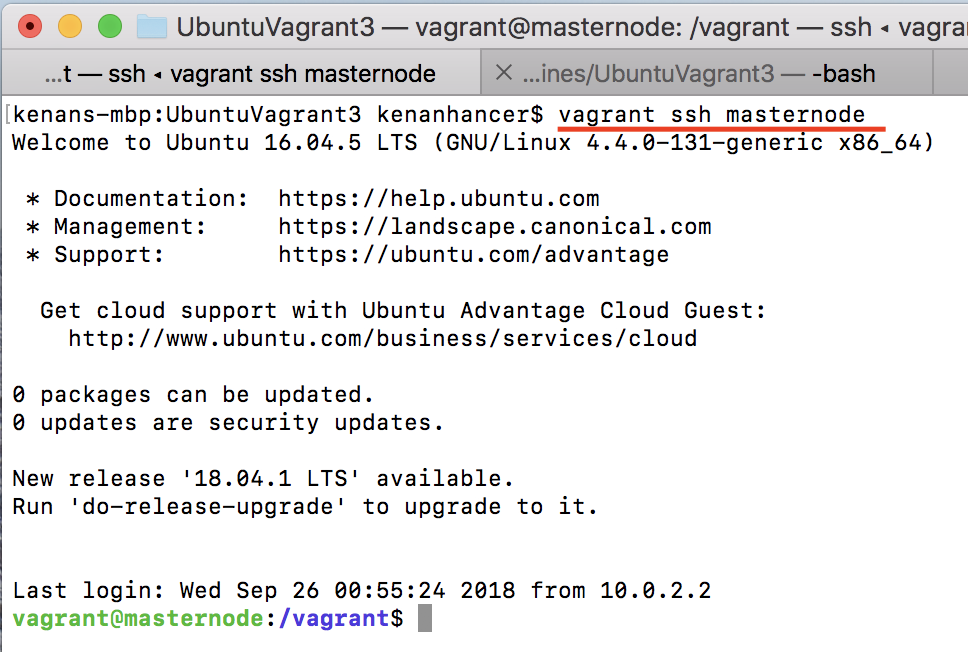
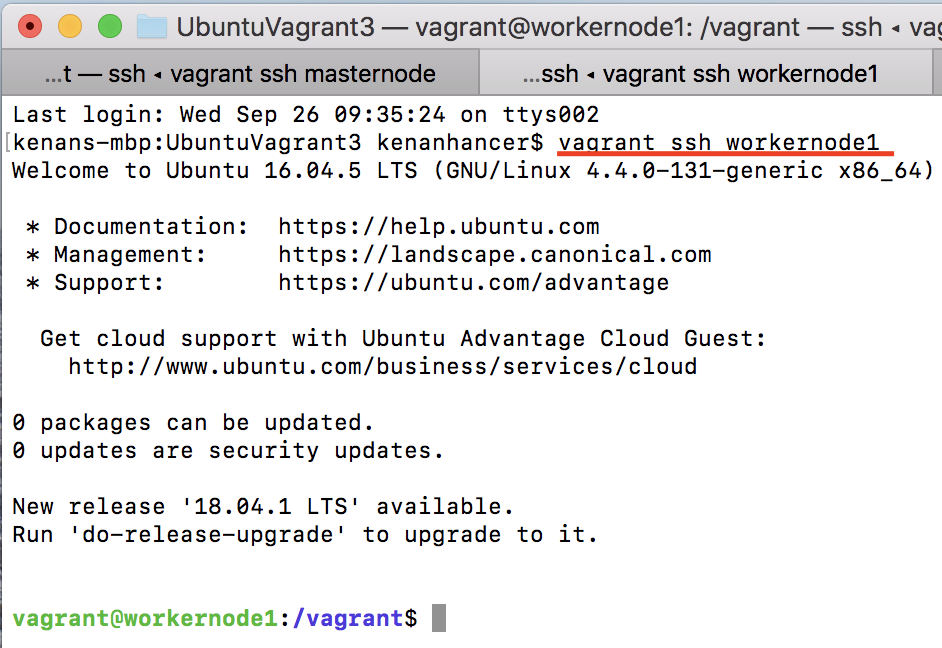
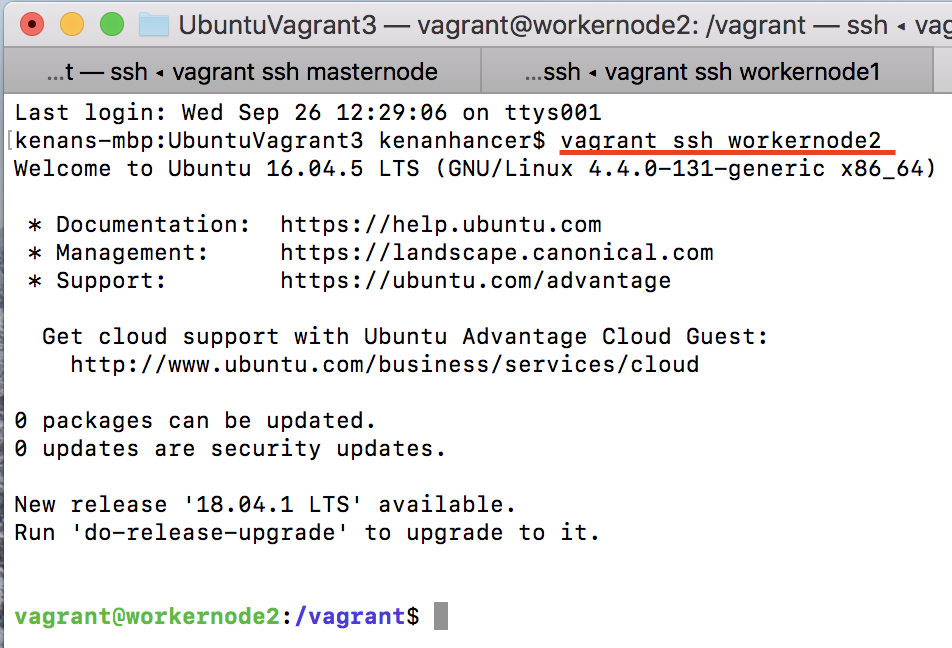
Let's connect via SSH to Vagrant machines. As you can see, three terminal window is open and connected to masternode, workernode1, and workernode2 respectively. What we did till now was preparing environment to install Kubernetes cluster.
Kubernetes cluster installation
You can reach official installation details from the following page. But, I will also include all the steps here. 🙂
https://kubernetes.io/docs/setup/independent/install-kubeadm/
https://kubernetes.io/docs/setup/independent/create-cluster-kubeadm/
Installing Docker
apt-get update
apt-get install -y apt-transport-https ca-certificates curl software-properties-common
curl -fsSL https://download.docker.com/linux/ubuntu/gpg | apt-key add -
add-apt-repository "deb https://download.docker.com/linux/$(. /etc/os-release; echo "$ID") $(lsb_release -cs) stable"
apt-get update && apt-get install -y docker-ce=$(apt-cache madison docker-ce | grep 17.03 | head -1 | awk '{print $3}')
Installing kubeadm, kubelet and kubectl
apt-get update && apt-get install -y apt-transport-https curl
curl -s https://packages.cloud.google.com/apt/doc/apt-key.gpg | apt-key add -
cat <<EOF >/etc/apt/sources.list.d/kubernetes.list
deb http://apt.kubernetes.io/ kubernetes-xenial main
EOF
apt-get update
apt-get install -y kubelet kubeadm kubectl
apt-mark hold kubelet kubeadm kubectl
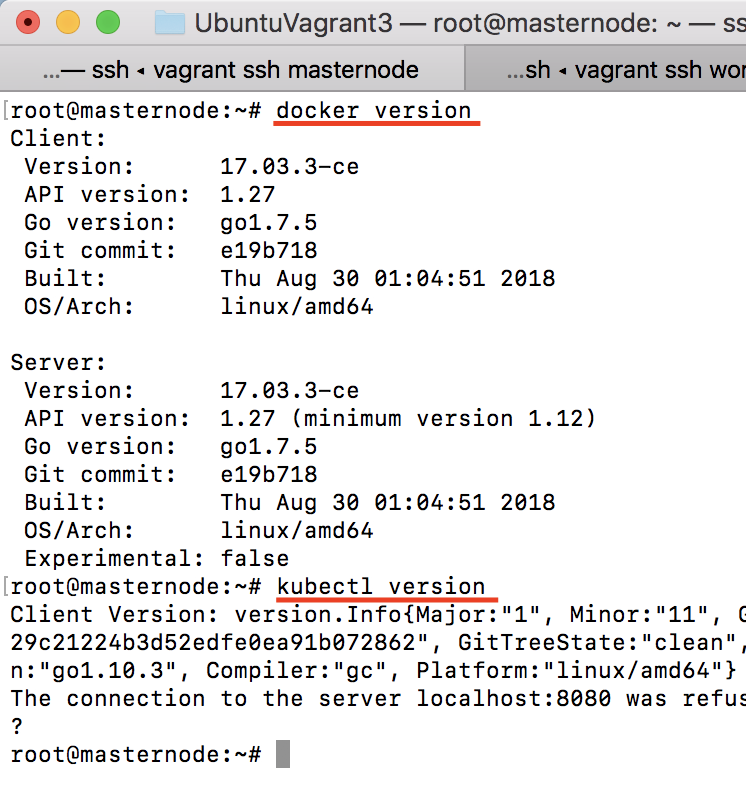
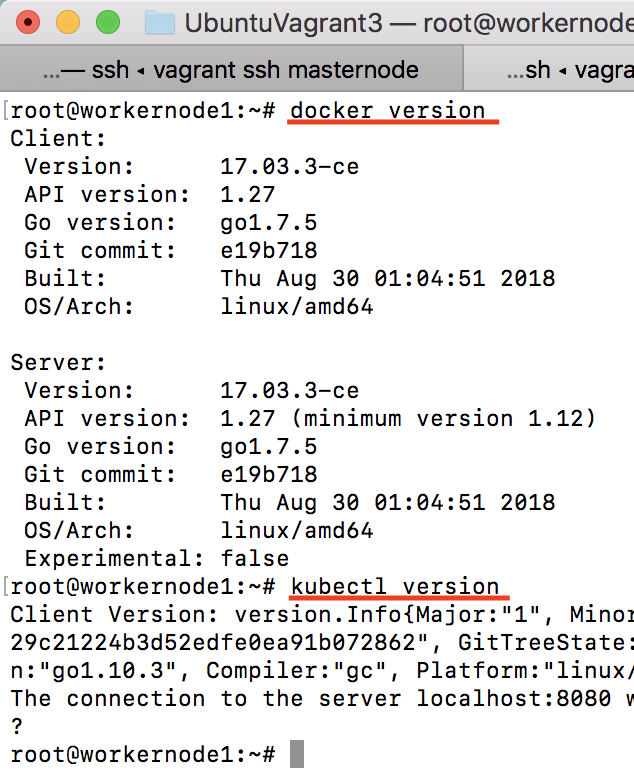
Let's check docker and kubectl is installed properly. Your installation should seem as below.

Initializing Master Node
Execute the following code in master node terminal. It will take several seconds.
kubeadm init --apiserver-advertise-address="192.168.33.10"
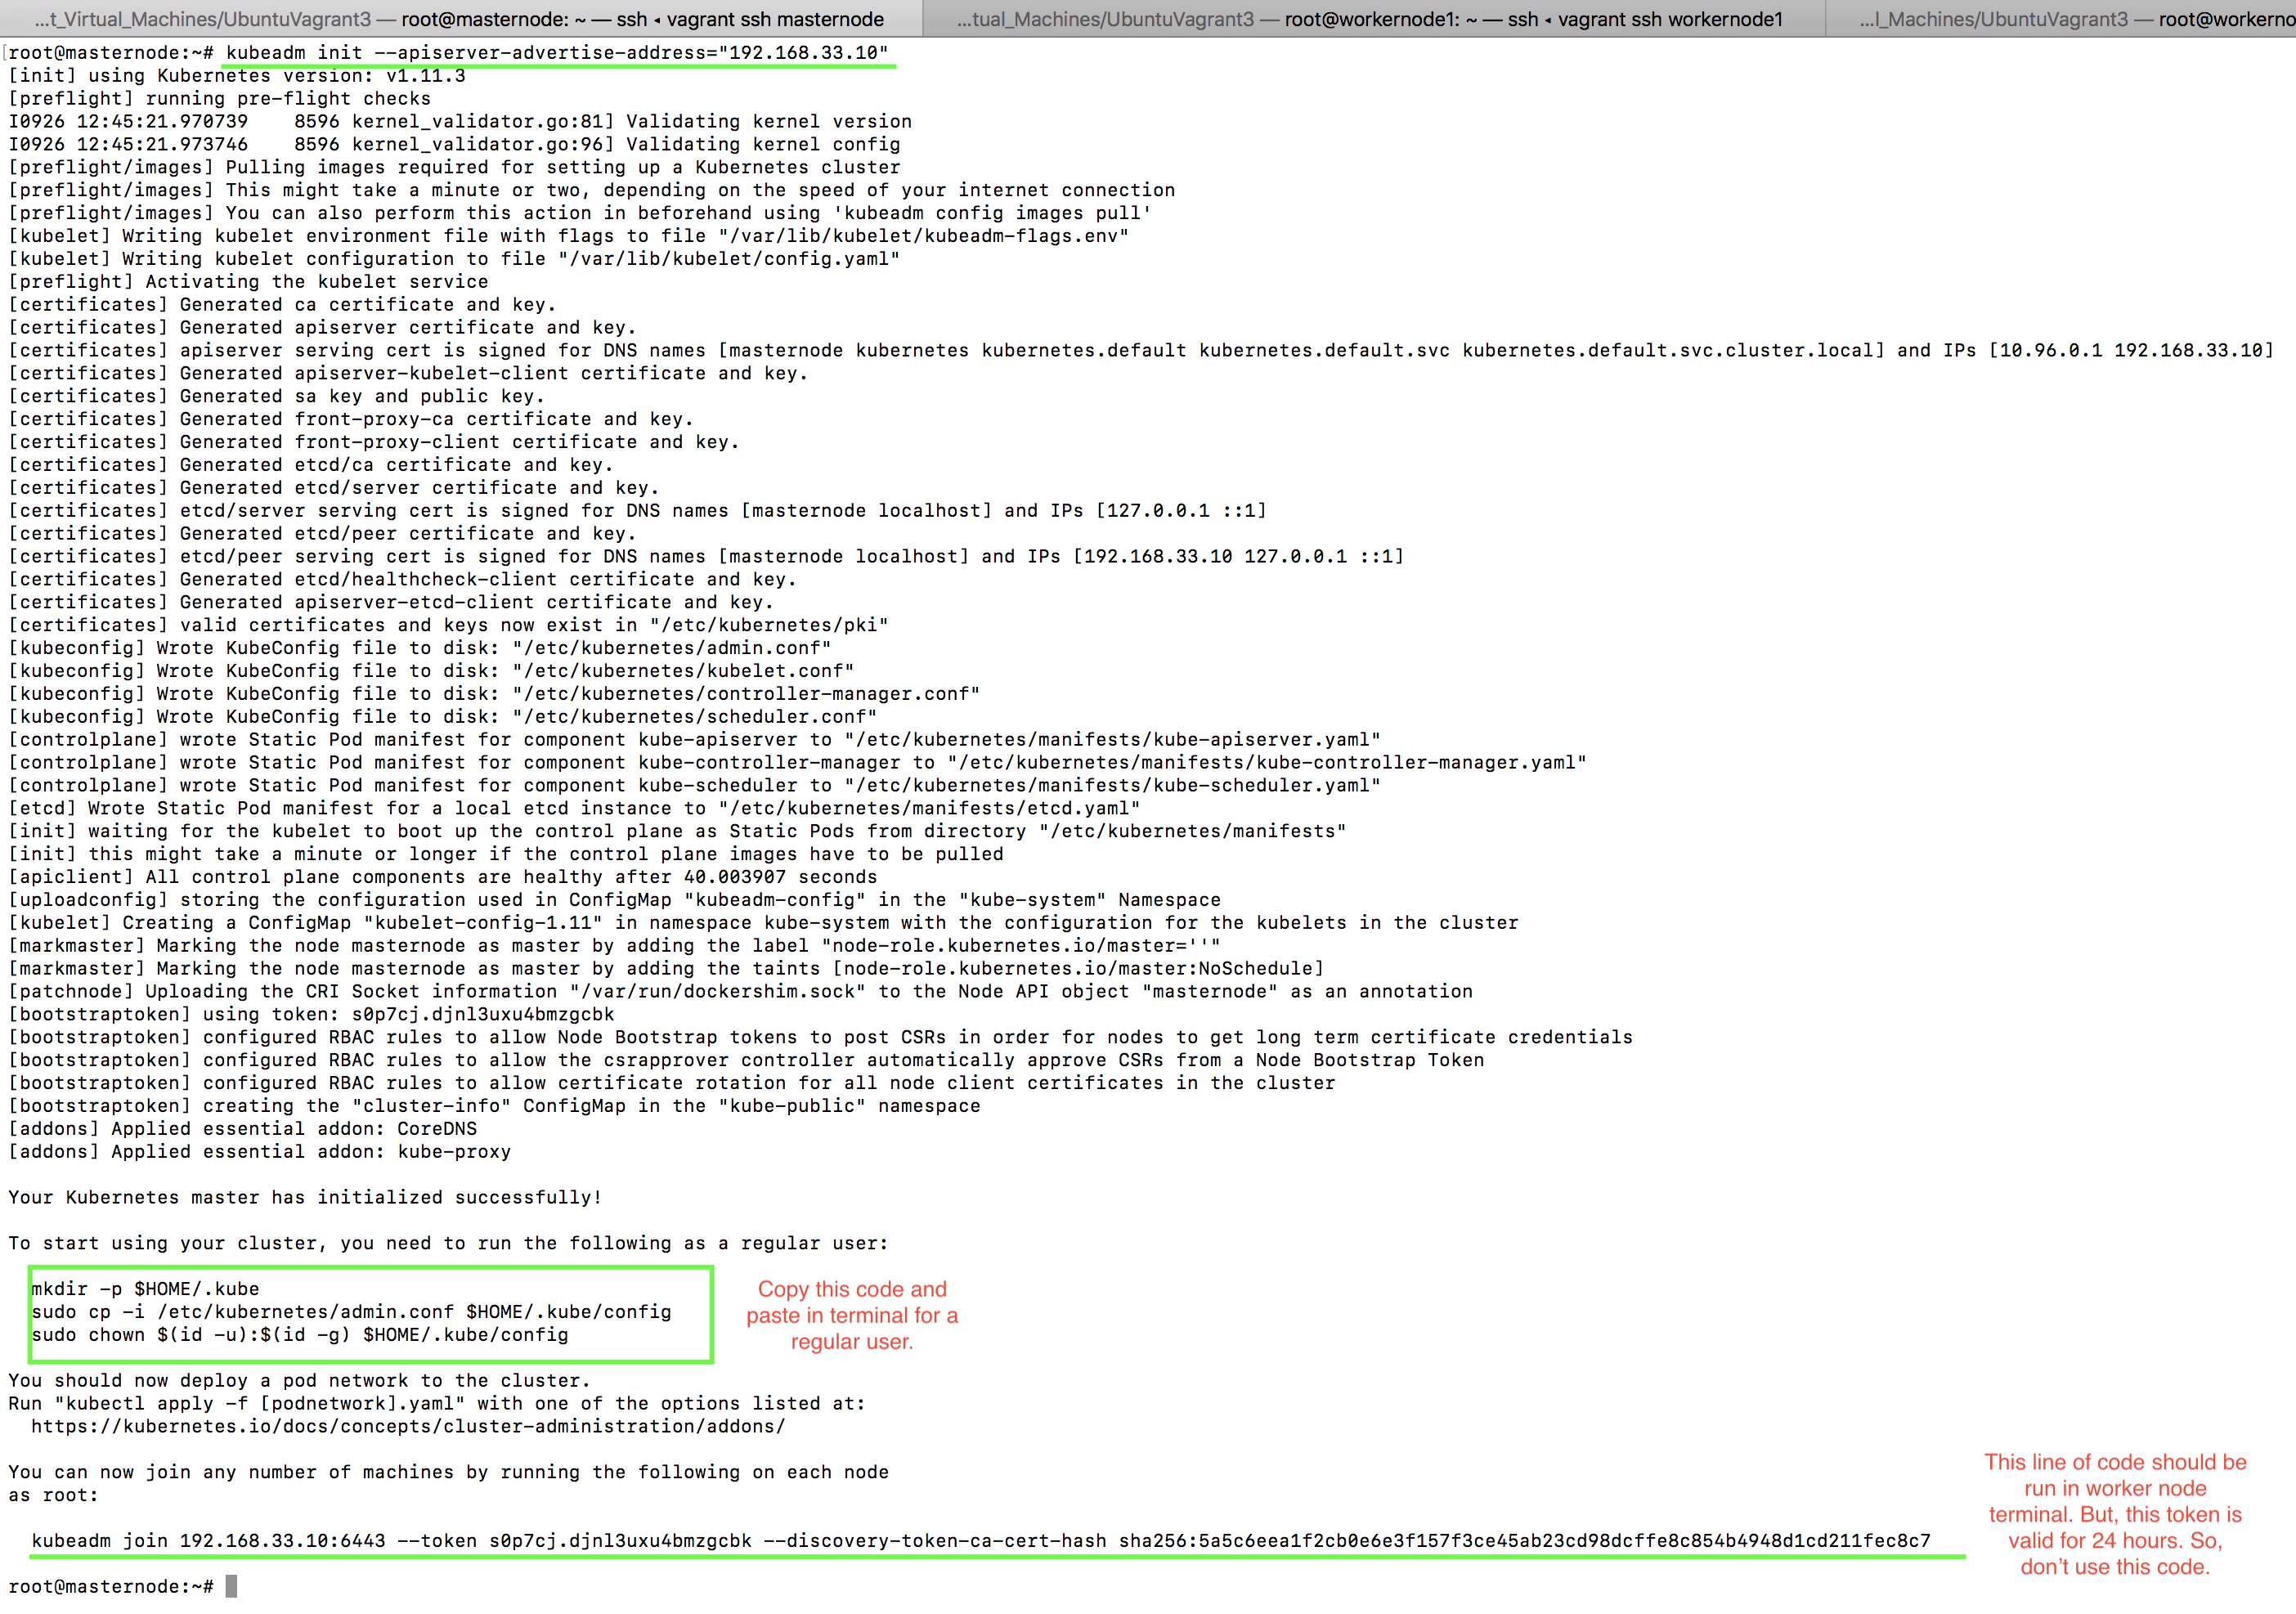
Copy the following code from output of previous command and run in terminal window as below

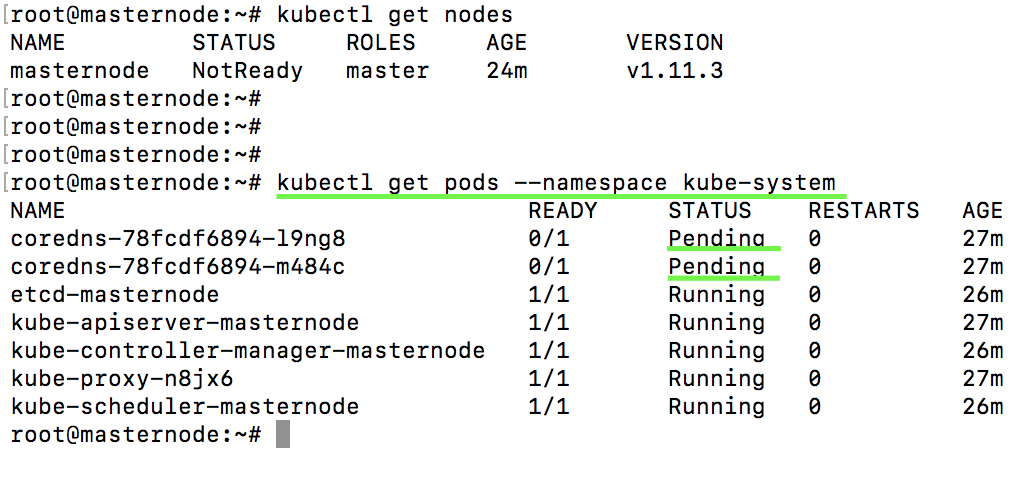
Let's check the nodes in Kubernetes cluster with the following code. As you can see, there is only master node and status is NOT READY

It is not ready because, the installation didn't finish yet. When we check the pods in cluster, there are pods which have pending status.
We need to install one pod network per cluster by running following codes.
kubectl apply -f "https://cloud.weave.works/k8s/net?k8s-version=$(kubectl version | base64 | tr -d '\n')"
sysctl net.bridge.bridge-nf-call-iptables=1

When I check the pods in cluster, status of all pods is running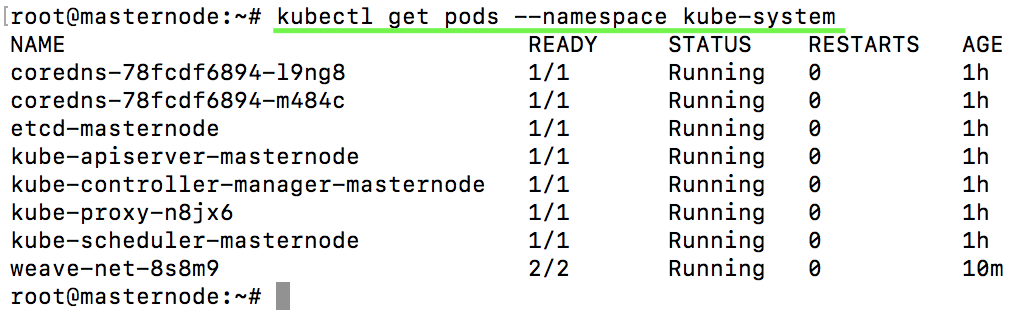
We finished all the works for master node and now we need to create a token for work nodes to join master node. As I mentioned in previous lines, I didn't use the default token because it is valid for 24 hours. You can see below picture is showing created tokens in list.
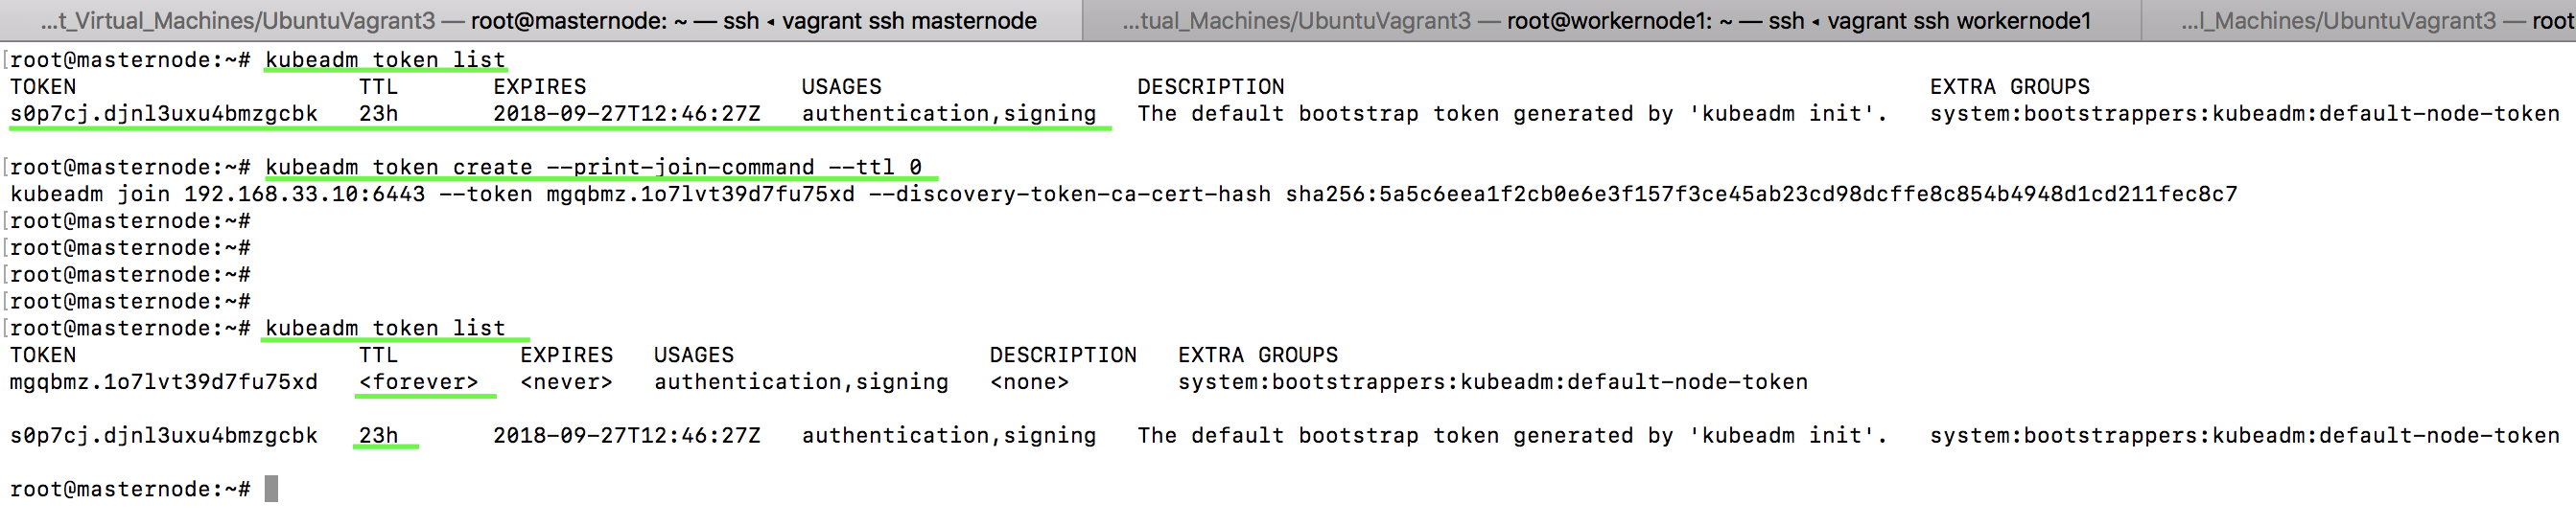
I created new token with the following code and TTL is forever.
kubeadm token create --print-join-command --ttl 0
Generated token is as below for me.
kubeadm join 192.168.33.10:6443 --token mgqbmz.1o7lvt39d7fu75xd --discovery-token-ca-cert-hash sha256:5a5c6eea1f2cb0e6e3f157f3ce45ab23cd98dcffe8c854b4948d1cd211fec8c7
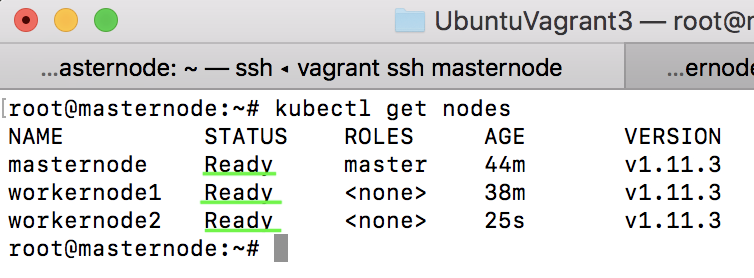
Copy result of the code and paste in Worker nodes respectively.
run the following code in masternode terminal window and all worker nodes should appear Ready.
Checking kube config
I delete KUBECONFIG variable on purpose in order to show effect of kube config from terminal. If you set KUBECONFIG environment variable, then kubectl command will search config file in that location. kubectl looks by default in $HOME/.kube/config. But, if you set this variable for different location, you need to have config file in that location otherwise, kubectl will not work. If you didn't set this environment variable, then you need to have config file in $HOME/.kube/config.
First of all, I unset this environment variable to see effects on kubectl command.
unset KUBECONFIG
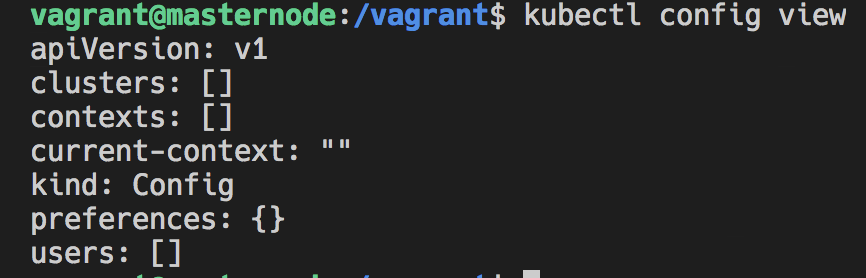
As you can see, it showed a blank config.
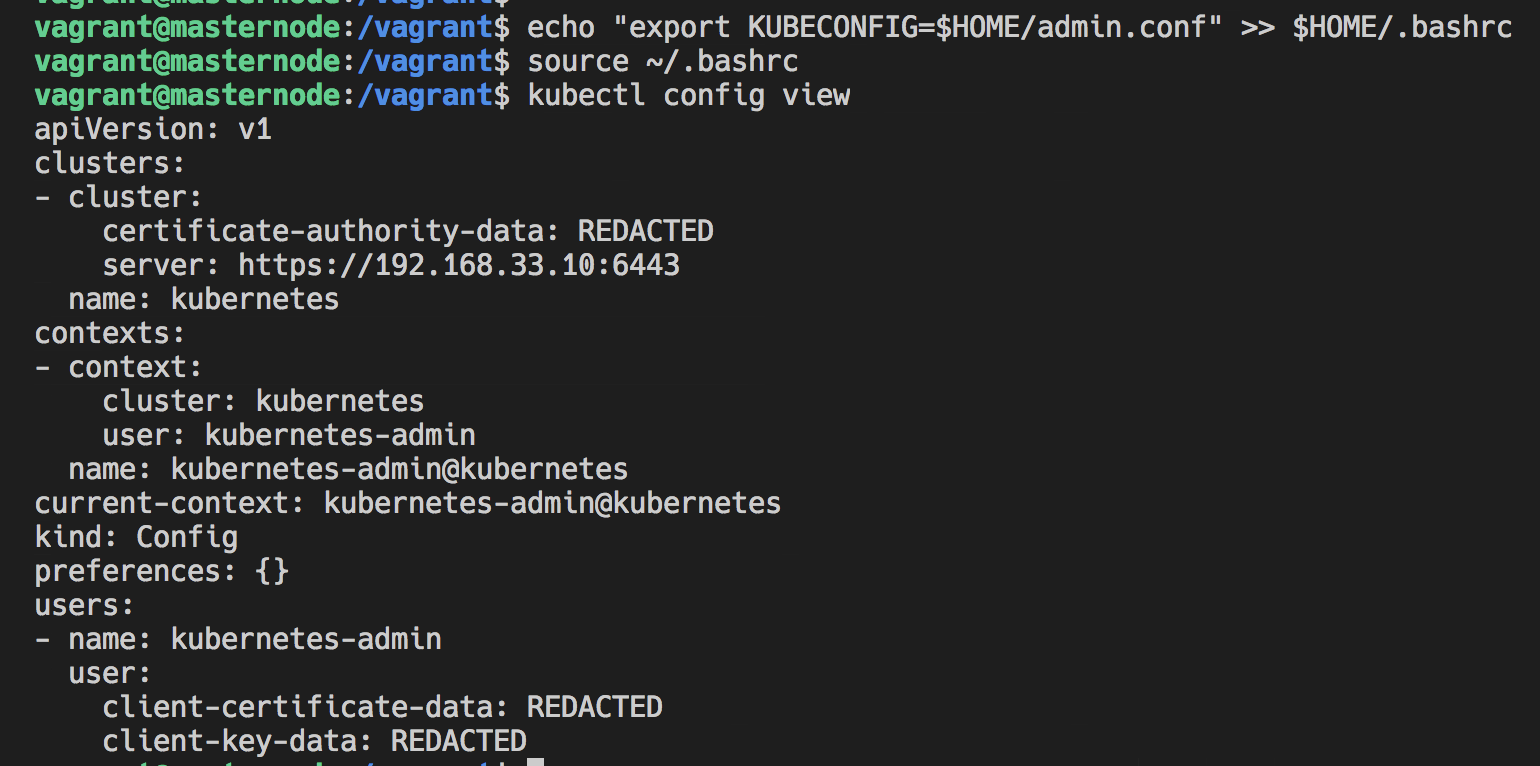
If you run the following command, it will set KUBECONFIG and put this config in .bashrc file so that when you restart this machine you don't need to reset that value again.
echo "export KUBECONFIG=$HOME/admin.conf" >> $HOME/.bashrc

source $HOME/.bashrc

kubectl config view
You can see in the following terminal. This time it showed config. 🙂
If you want to see kubeconfig, run the following code in terminal.
cat $HOME/admin.conf

Connecting kubernetes cluster from any machine
First of all, you need to install kubectl on your machine with any of the following methods.
1- follow the Kubernetes official documentation https://kubernetes.io/docs/tasks/tools/install-kubectl/#install-kubectl-on-linux
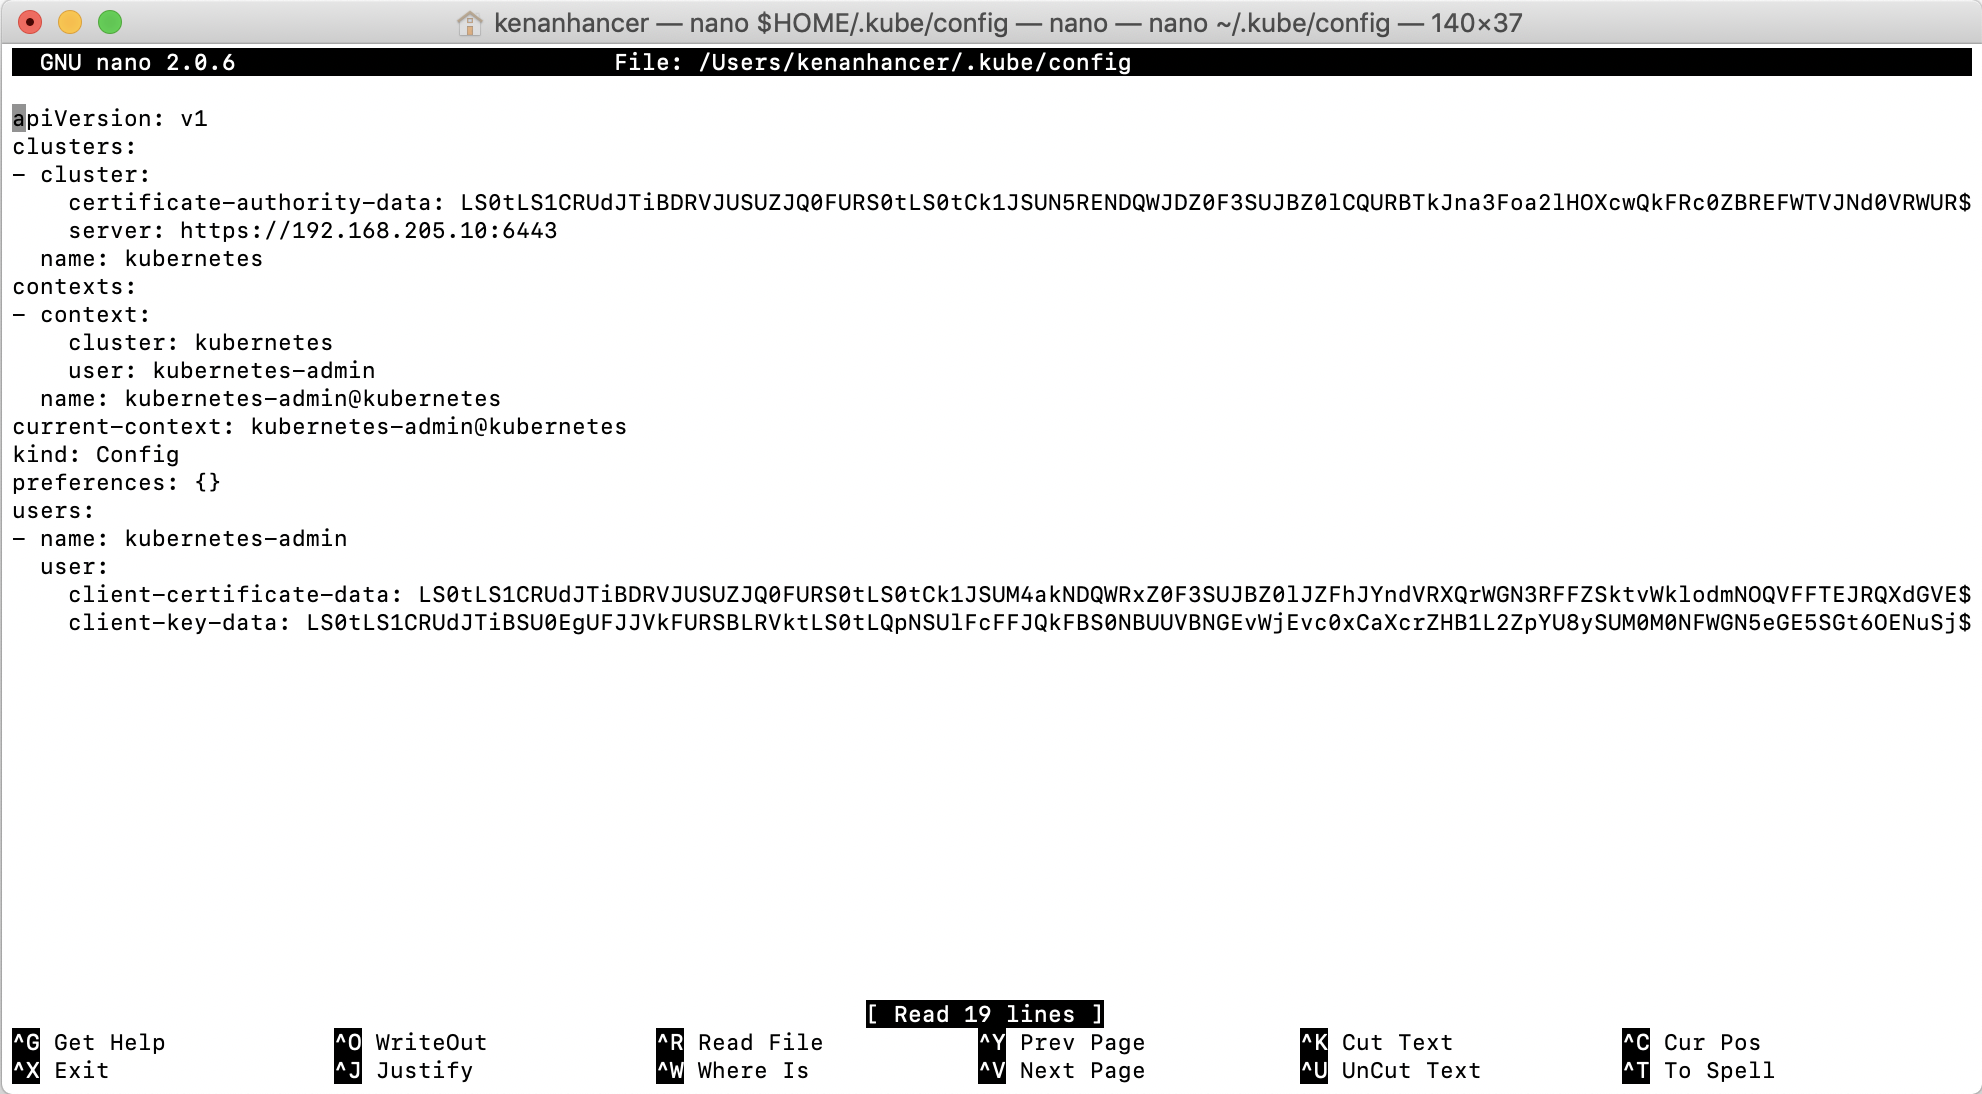
2- If you are using MacOS, then use brew command as shown below. after creating directory and config file copy admin.conf file content from your Kubernetes master node terminal, paste in your host machine like below screenshot and save.
brew install kubernetes-climkdir -p $HOME/.kubenano $HOME/.kube/config
Connecting kubernetes cluster with server
kubectl get nodes --server=https://192.168.33.10:6443
Connecting kubernetes cluster with kubeconfig
kubectl get nodes --kubeconfig $HOME/admin.conf
Including KUBECONFIG Environment Variable to .bashrc
If KUBECONFIG variable is not added in $HOME/.bashrc file, we will encounter with below error.
The connection to the server localhost:8080 was refused - did you specify the right host or port?
So run the following code in the terminal, so that KUBECONFIG variable will be added at the end of $HOME/.bashrc file.
Make sure to use >> and not >, as the latter will overwrite the file.
echo "export KUBECONFIG=$HOME/admin.conf" >> $HOME/.bashrc
Installing Kubernetes Dashboard
You can reach Kubernetes Dashboard project below link.
https://github.com/kubernetes/dashboard
Deploying the Dashboard UI
Run the following code in master node terminal to install Kubernetes Dashboard.
kubectl apply -f https://raw.githubusercontent.com/kubernetes/dashboard/v1.10.1/src/deploy/recommended/kubernetes-dashboard.yaml
Accessing the Dashboard UI
Our master node ip is 192.168.33.10. so, I specified IP address
kubectl proxy --address=192.168.33.10 --port=8001
or
kubectl proxy --address=0.0.0.0 --port=8001
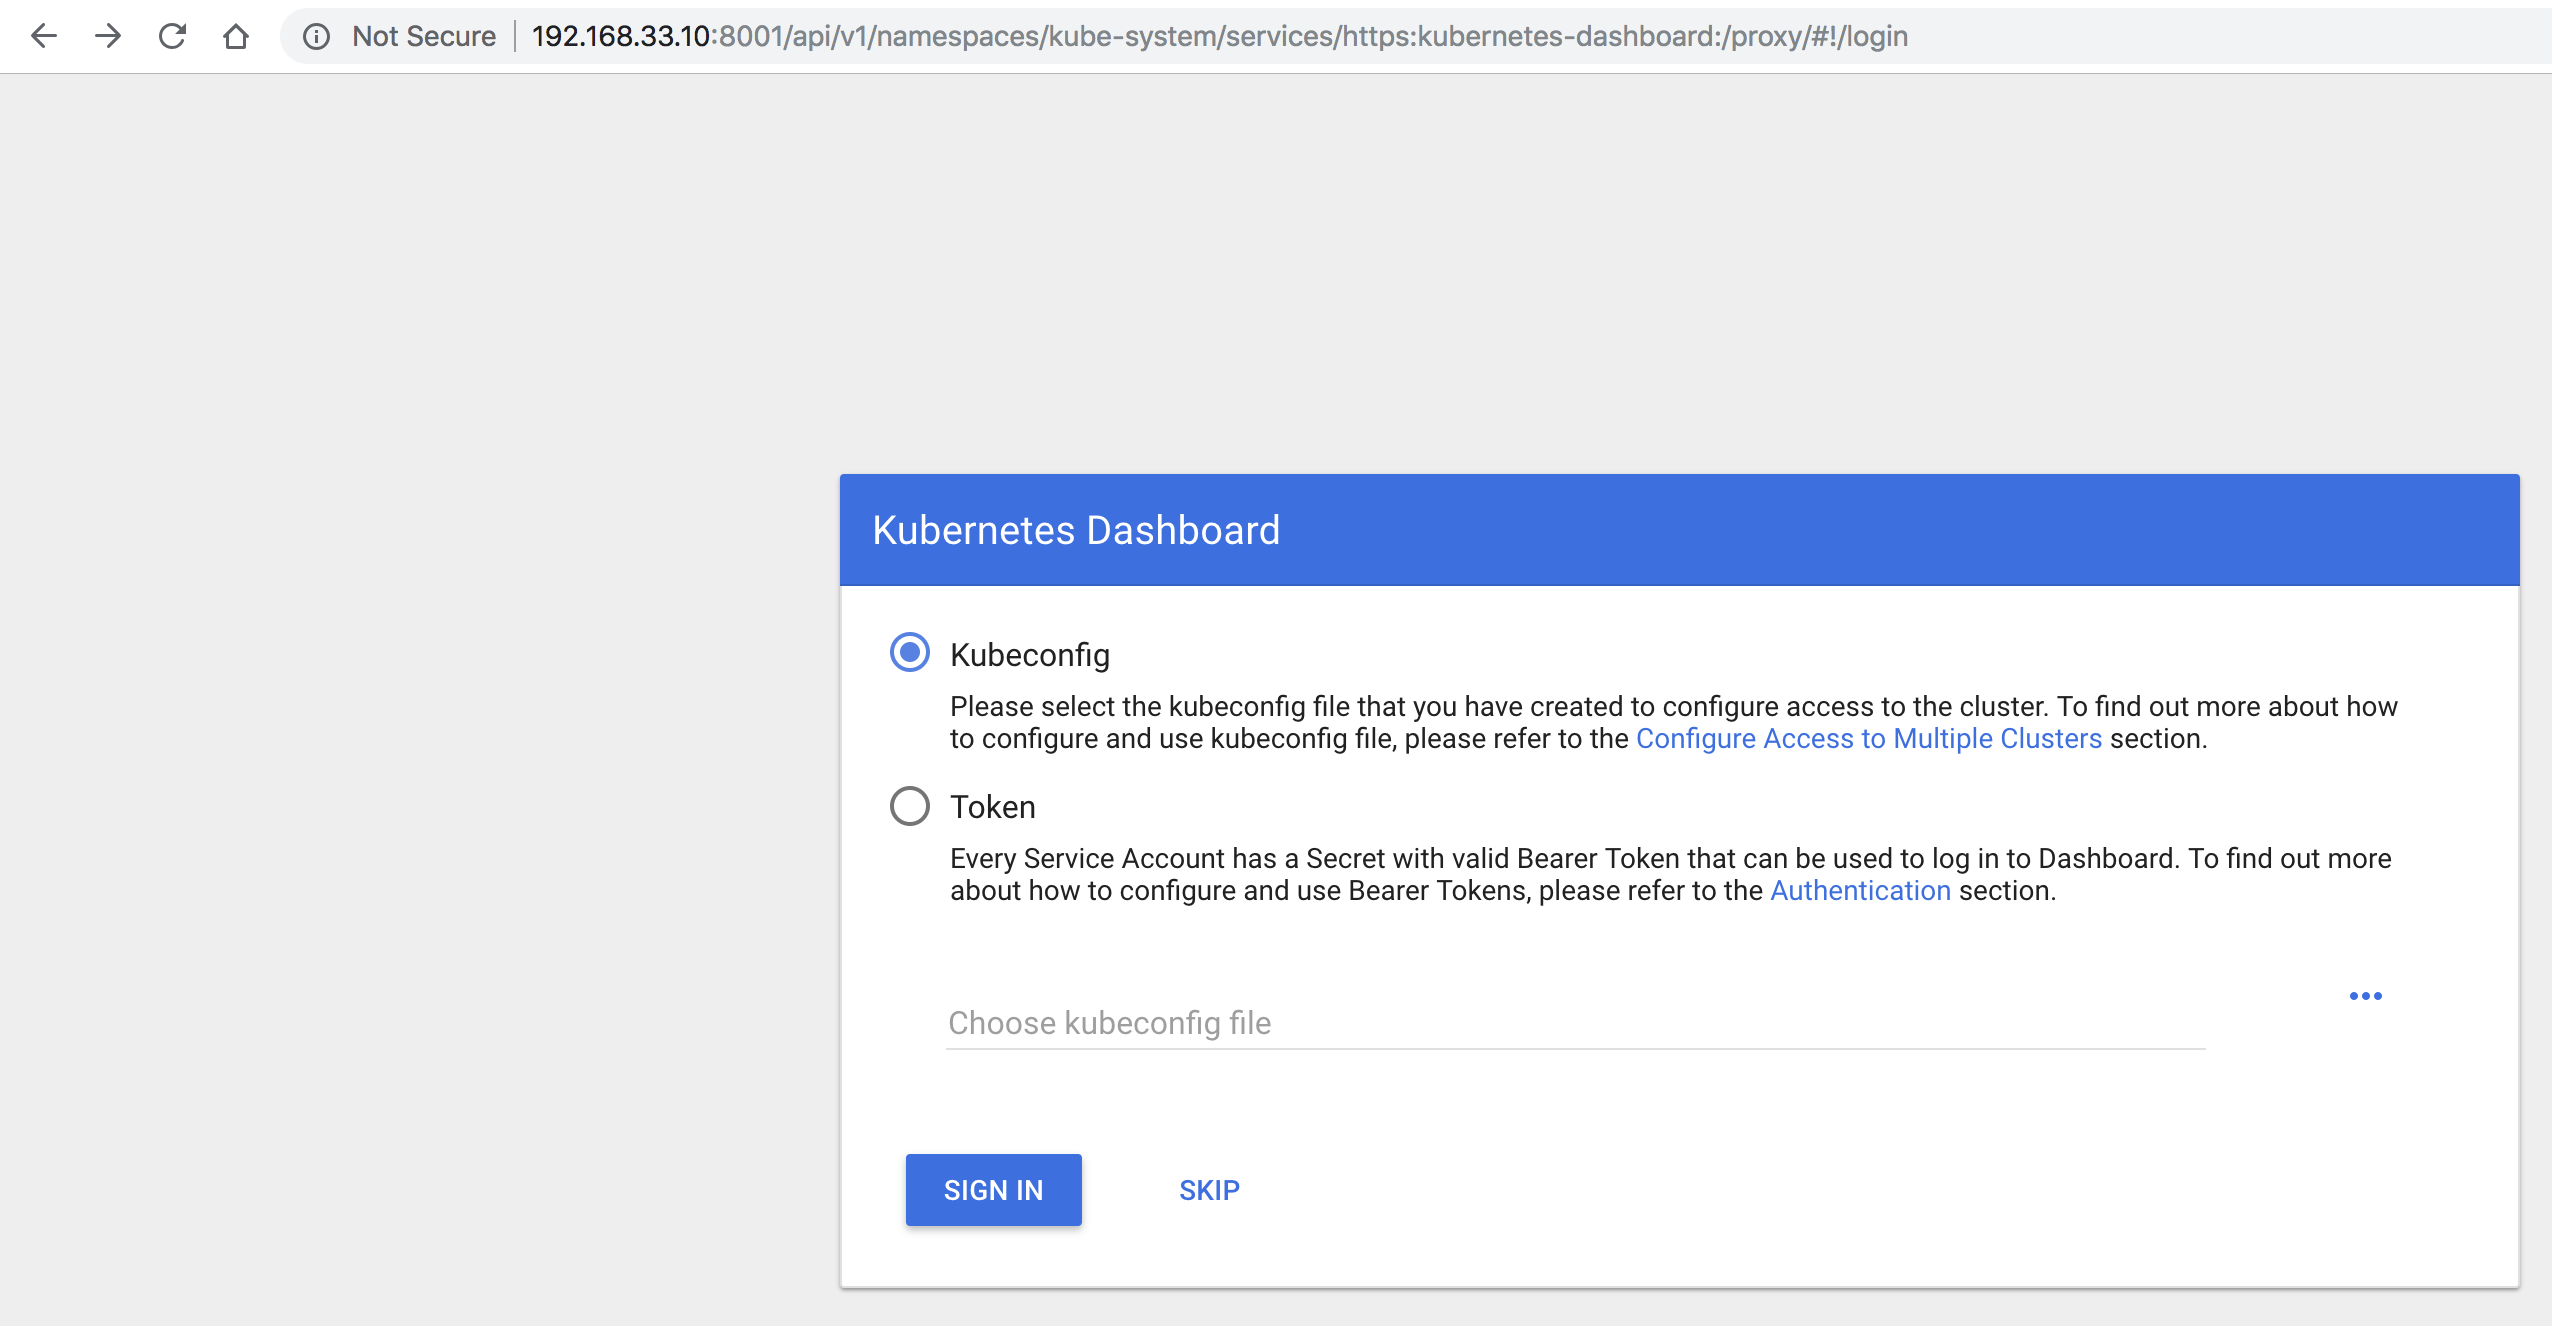
When you try below link from your local machine, you will see "unauthorized"
http://192.168.33.10:8001/api/v1/namespaces/kube-system/services/https:kubernetes-dashboard:/proxy/#!/login

So, run one of the following commands, and you will see below screen shot.
kubectl proxy --address=192.168.33.10 --port=8001 --disable-filter=true
or
kubectl proxy --address=0.0.0.0 --port=8001 --disable-filter=true
But, there is one more way to access dashboard. Run the following code so that it can be accessed by different host as below
kubectl proxy --address 0.0.0.0 --port=8001 --accept-hosts '.*'
Accessing the Dashboard UI with SSH tunnel
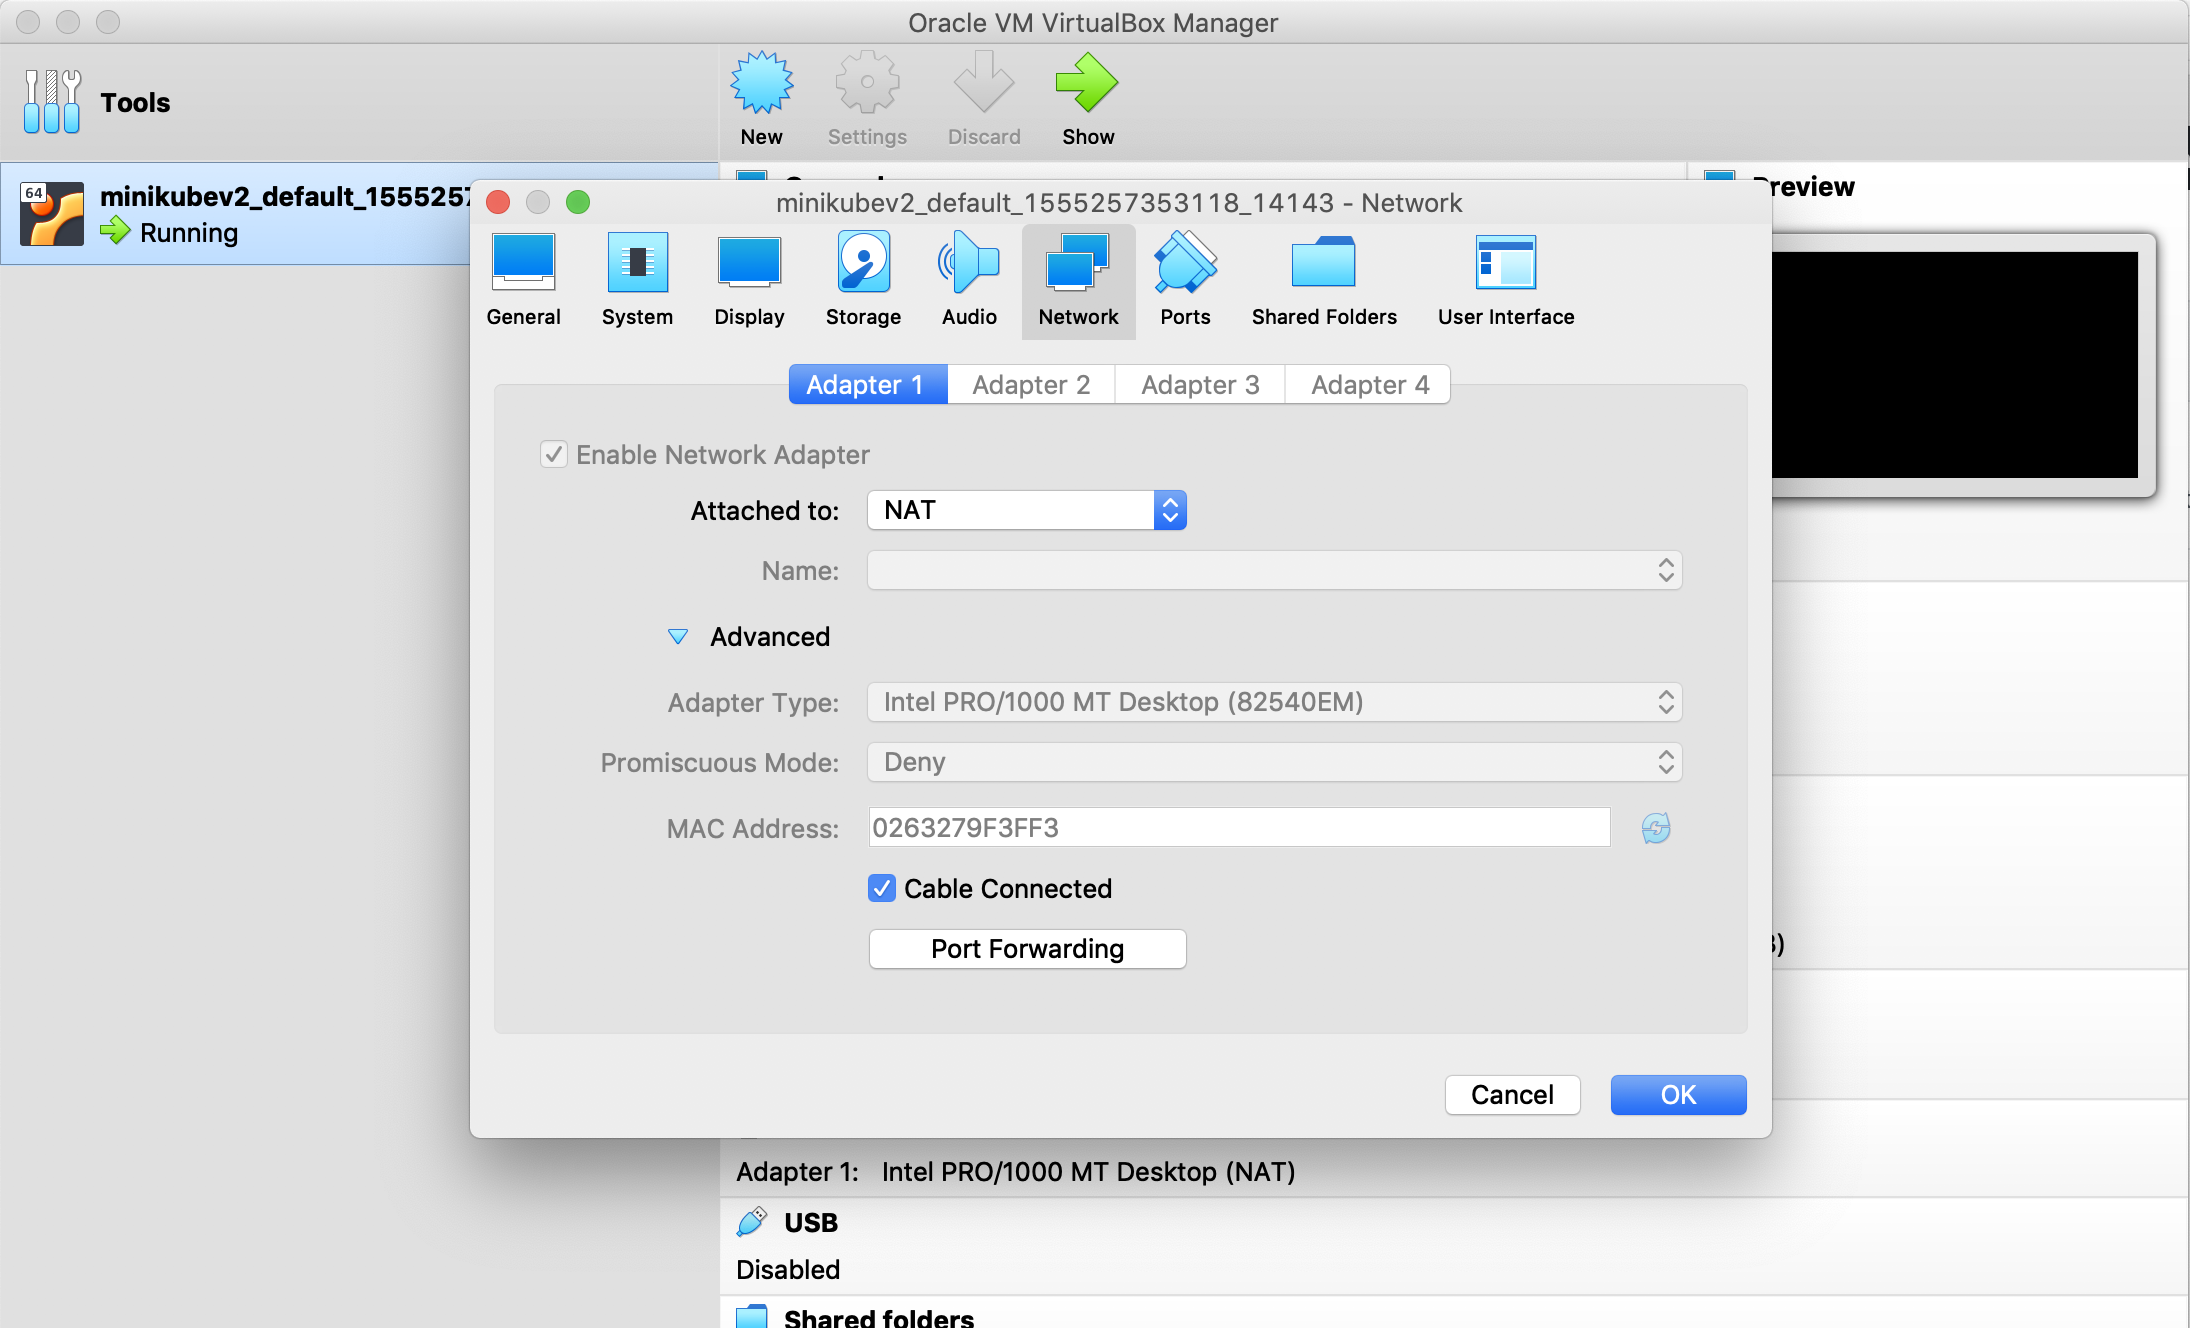
If your vagrant machine doesn't have private IP address, this means that it is working on localhost(vagrant with forwarded_port). If you are using vagrant with vm-driver=Virtualbox. Your virtual machine will appear as below.
let's run the following code in vagrant virtual machine (You can connect with vagrant ssh in Vagrantfile location).
kubectl proxy
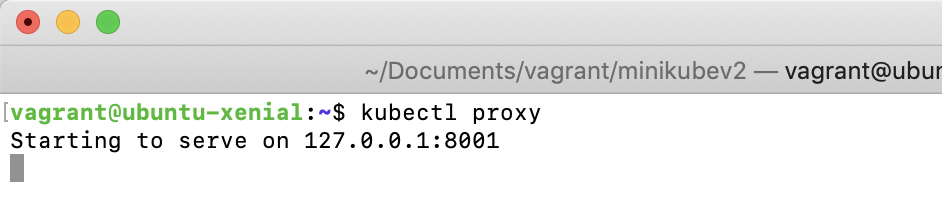
we have to open ssh tunnel from host machine to vagrant machine. So, change directory to Vagrantfile location and run the following code in your host machine (probably your laptop).
left side local port 8001 <-> right side Vagrant port 8001
ssh -L 8001:localhost:8001 vagrant@localhost -p 2222 -i .vagrant/machines/default/virtualbox/private_key -fNg

Now you can see Kubernetes Dashboard screen in your host machine browser as below. So, call this link.

Kubernetes Dashboard Access Control
Bearer Token
There are many Service Accounts created in Kubernetes by default. All with different access permissions. In order to find any token, run the following code in Vagrant terminal.
kubectl -n tube-system get secret
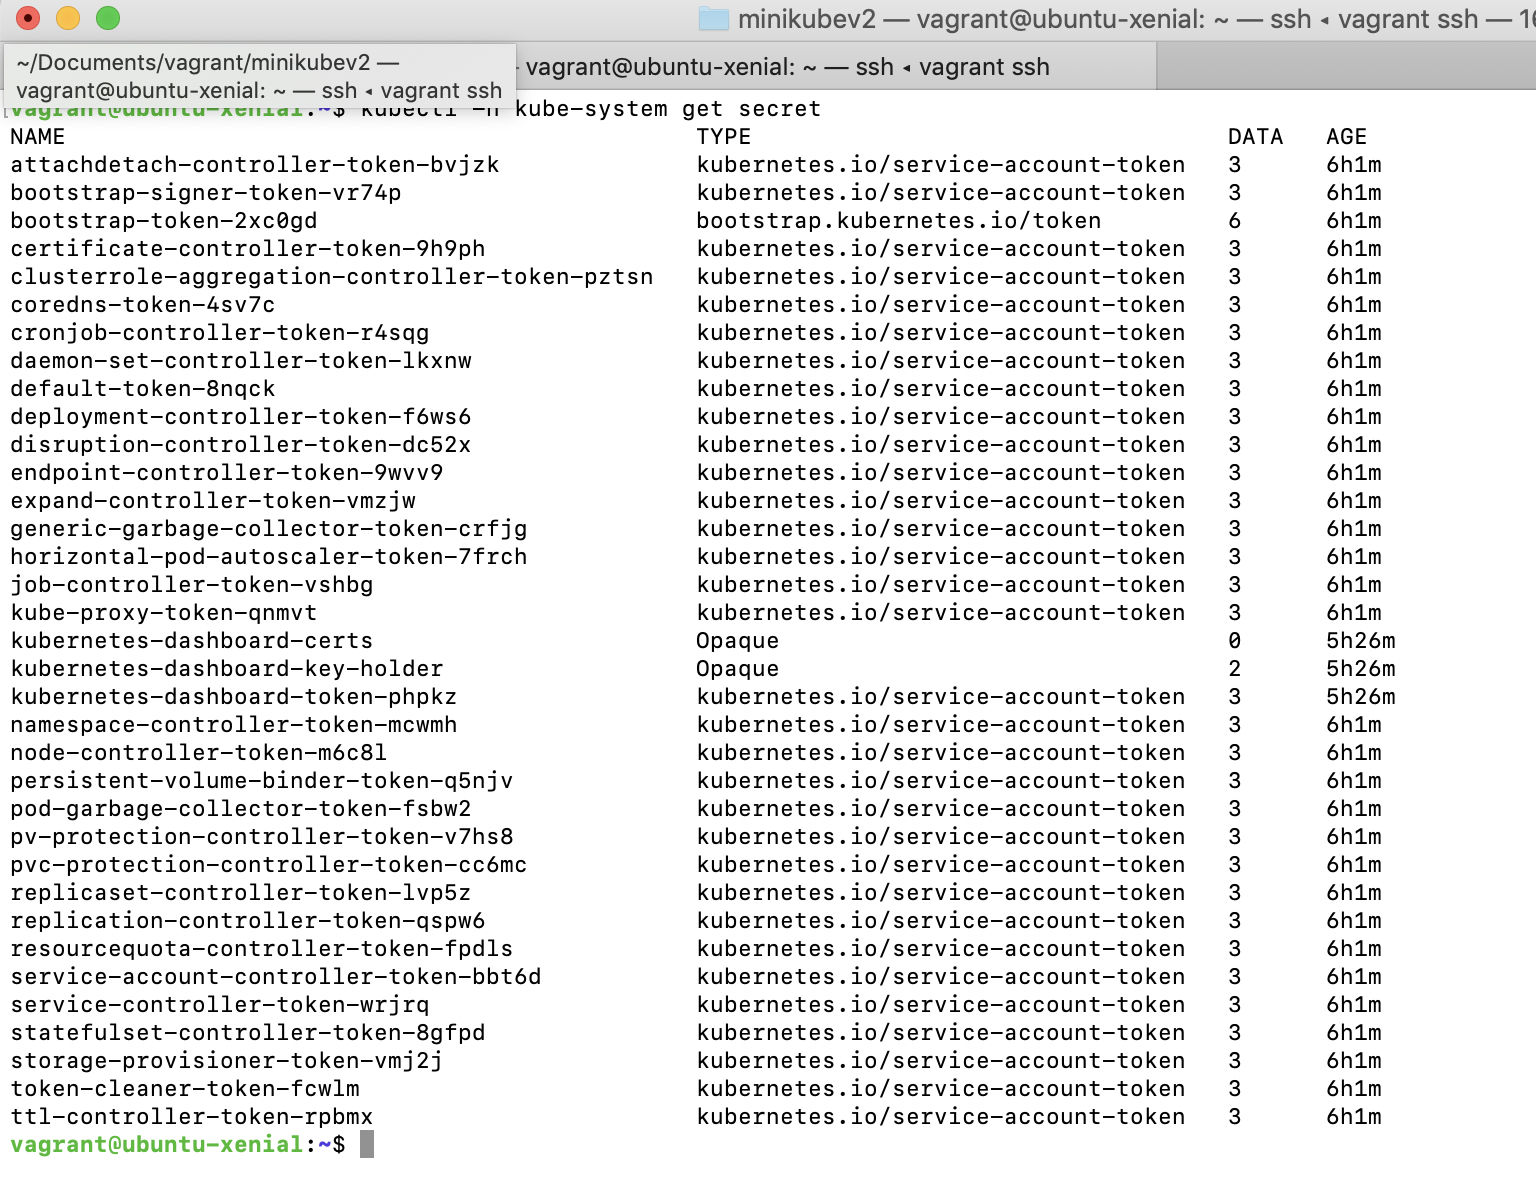
As you can see, I choose default-token
kubectl -n kube-system describe secrets default-token-8nqck

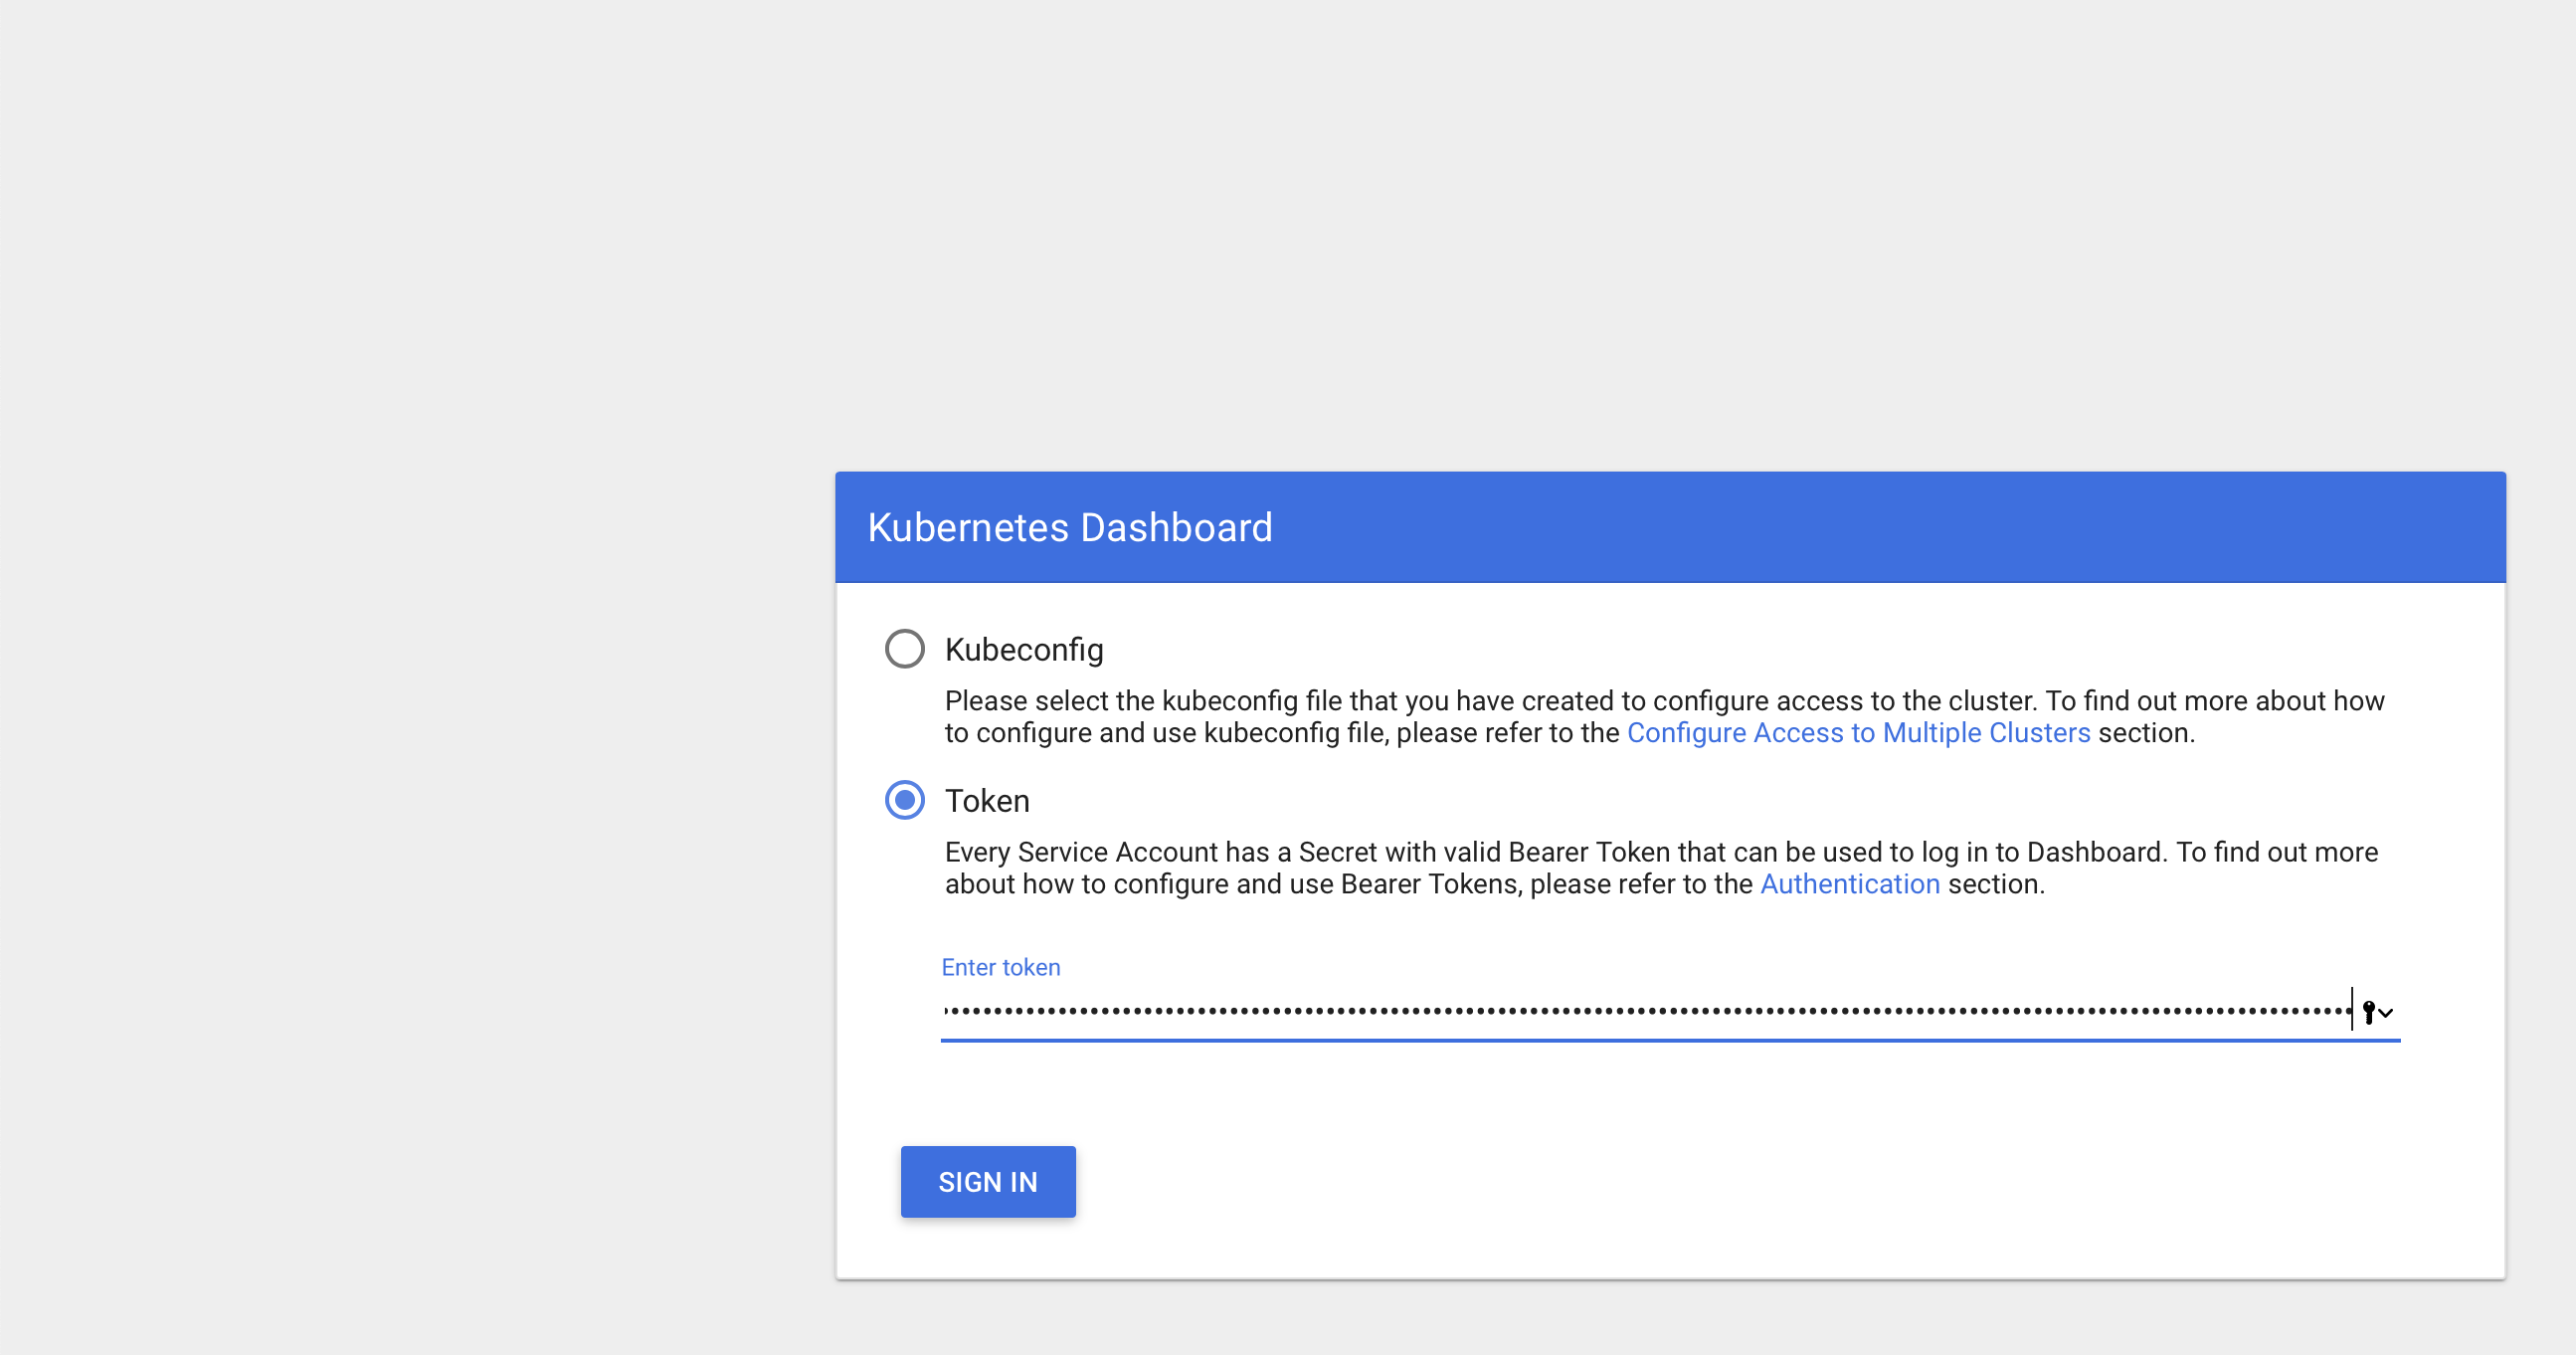
Copy token value from vagrant terminal and paste browser token textbook in host machine as below.

If you want to login with different token value, click right top corner button and click logout as below.
